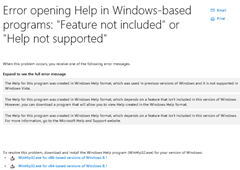
It is amazing how some vendors of libraries in the automation industry still require you to read help files in the old Microsoft hlp format. Trying to open such a file results EDGE to show you the following screen.
If you think you can download and install the version for Windows 8.1. you are wrong. But do not throw away your downloaded MSU-File (for Windows 8.1 x64 the name is Windows8.1-KB917607-x64.msu).
Start your command prompt as Administrator!
 First extract the content of the MSU File to another directory:
md ContentMSU
expand Windows8.1-KB917607-x64.msu /F:* .\ContentMSU
Now we can extract the contained CAB-File:
cd ContentMSU
md ContentCAB
expand Windows8.1-KB917607-x64.cab /F:* .\ContentCAB
This will extract 279 files. Depending on your culture and language settings we need to locate the right MUI-File. My language is german so I use “de-”. English folk use “en-“.
cd ContentCAB
dir amd64*de-*.
People who use the x86 variant need to run “dir x86*de-*.”
Navigate to the given path, in my case
cd amd64_microsoft-windows-winhstb.resources_31bf3856ad364e35_6.3.9600.20470_de-de_1ab8cd412c1028d0
Here we will find “winhlp32.exe.mui”. We need to replace %SystemRoot%\de-de\winhlp32.exe.mui with our new file:
takeown /f "%SystemRoot%\de-de\winhlp32.exe.mui"
icacls "%SystemRoot%\de-de\winhlp32.exe.mui" /grant "%UserName%":F
ren %SystemRoot%\de-de\winhlp32.exe.mui winhlp32.exe.mui.w10
copy winhlp32.exe.mui %SystemRoot%\de-de\winhlp32.exe.mui
takeown /f "%SystemRoot%\winhlp32.exe"
cd ..
icacls "%SystemRoot%\winhlp32.exe" /grant "%UserName%":F
ren %SystemRoot%\winhlp32.exe winhlp32.exe.w10dir *.exe /s
Find the right path starting either with amd64 or x86 and navigate to it
cd "amd64_microsoft-windows-winhstb_31bf3856ad364e35_6.3.9600.20470_none_1a54d9f2f676f6c2"
copy winhlp32.exe %SystemRoot%\winhlp32.exe
It’s difficult, you have to be careful, but it worked fine in Windows 10 x 64
Es algo dificil, hay que tener mucho cuidado, pero me funcionó bien en windows 10 x 64
LikeLike
Thank you for easing the pain post-upgrade.
For EN-US, on a x86 machine, I did:
takeown /f „%SystemRoot%\en-us\winhlp32.exe.mui“
icacls „%SystemRoot%\en-us\winhlp32.exe.mui“ /grant „%UserName%“:F
ren %SystemRoot%\en-us\winhlp32.exe.mui winhlp32.exe.mui.w10
copy winhlp32.exe.mui %SystemRoot%\en-us\winhlp32.exe.mui
takeown /f „%SystemRoot%\winhlp32.exe“
icacls „%SystemRoot%\winhlp32.exe“ /grant „%UserName%“:F
ren %SystemRoot%\winhlp32.exe winhlp32.exe.w10
cd ..
cd „x86_microsoft-windows-winhstb_31bf3856ad364e35_6.3.9600.20470_none_be363e6f3e19858c“
copy winhlp32.exe %SystemRoot%\winhlp32.exe
LikeLike
Merci beaucoup pour ce tutoriel : une pure merveille!
Pour la version française, toujours sous W10 64 bits, il suffit de remplacer, dans les instructions en ligne de commande, „de-de“ par „fr-fr“.
danke sehr
LikeLike
I tried you solution.
It worked, and now I can read HLP file of my Borland Delphi 7 on my Windows 10 Pro 64 bit.
Thank you very very very much !!!
God bless you !
Bye, Sandro
LikeLike
I tried this solution… it works!!!
Now I can read my Borland Delphi 7 Help files in my Windows 10 Pro 64 bit !!!
Thank you very very very much!!!
Bye, Sandro
LikeLike
Pingback: Getting Winhlp32 work on Windows 10 – Tonmann.com
„It is amazing how some vendors of libraries…..“ – well, some USERS, (remember them?) have older programs because they can’t afford to upgrade to the latest version OR there is no current program that does the same as the old one.YOU may have unlimited funds or the ability to write new programs, users generally don’t have either.
LikeLike
Wow – what an absolute genius!
Your solution worked perfectly for me. I huge big thank you.
Andy
LikeLike
Awesome. A thousand blessings upon you.
LikeLike
you are awesome. That worked
LikeLike
This worked for me, thanks a lot!
Note 1: Once you have the .msu and .cab extracted, you can also use Windows explorer to copy the relevant files (you will get gui dialogs asking to confirm renaming/copying operations)
Note 2: The .msu files contains only en-US, not en-GB. I have a en-GB system and had to rename the existing „$SYSTEMROOT$\en-GB\winhlp32.exe.mui“ to something else, and place the downloaded winhlp32.exe.mui in „%SYSTEMROOT%\en-US“ for this to work.
Thanks again, this is a lifesaver when working on old C++ Builder 6 applications (Especially since the old docs are nowhere to be found online anymore)
LikeLike
Pingback: Getting Winhlp32 work on Windows 10 – Tonmann.com
Thank you,
your info and your website really helped ! A much simpler solution is: dig the winhelp32.exe and winhelp32.exe.mui files from your old windows backup (W7 in my case), rename them to winhelp32_john.exe and winhelp32_john.exe.mui, or so, and place them in your \windows and \windows\en-us directories, respectivelty (assuming that en-us is your language). Next change the association of .hlp files to winhelp32_john.exe. That is all.
LikeLike
OMG it works !!!
Delphi 6 help works on Win10 64bit.
God bless you !
LikeLike