I recently had the opportunity to give an introduction into API Management at the Global Azure Bootcamp 2016 in Linz. You can find the pickings of that event here (german only). I decided to publish my slides about API Management but also some information about the demo environment I used.
Ok this turned out to be more a blog post about how to authenticate Web Apps with Web API Apps ![]()
First and foremost, to play around with Azure API Management you need a Microsoft Azure Subscription, which you can get here.
My demo environment looked like this:
- 1 developer instance of API Management managed through the classic azure portal.
- 1 azure resource group where I run a free App Service Plan managed through the new azure portal with
- 3 Azure API Apps (CalcGAB2016, CalcEnterprise, CalcEnterpriseClient)
- 1 azure active directory instance managed through the classic azure portal.
If you plan to create API Apps yourself I recommend to use the template “Azure API APP” in ASP.NET applications. This will come preconfigured with the Swashbuckle packages which allow to create an OPEN API SPECIFICATION (formerly known as swagger) document straight from your code. You can read more here about how to customize the swashbuckle generated api definitions.
Now to my sample code. Since there is plenty of documentation on how to use API-Management (you can find an incomplete but helpful list in the last slide of my presentation). My JWT-Token demo is based on the presentation from Darren Miller (see time – 7:30).
Therefore will focus instead on some specifics in the AAD Integration of the API app “CalcEnterprise” and the web app “CalcEnterpriseClient” which I have secured with AAD.
Securing Azure Web/API Apps
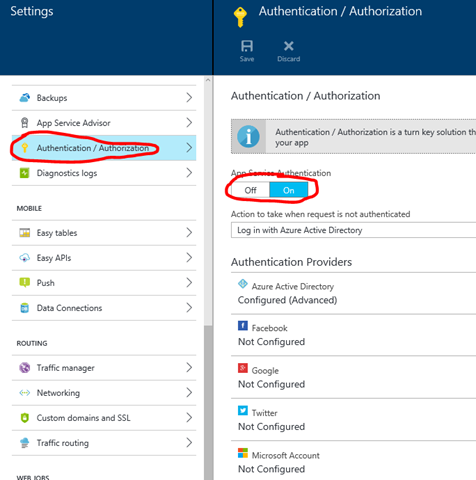
I love the idea that you can move out the authentication of your application and instead just configure it on the portal. Like a former colleague of me said: You do not want a web developer to write your authentication code ![]() . Instead you just write the application with “No Authentication” selected and configure the access in the new management portal:
. Instead you just write the application with “No Authentication” selected and configure the access in the new management portal:
Depending on the authentication you selected your ClaimsPrincipal.Current object will hold all claims provided by the authority that authenticated your visitors. Aside of that you receive the complete token and some other information about the authentication in the headers that Azure provides:
X-MS-CLIENT-PRINCIPAL-NAME=f.e. email
X-MS-CLIENT-PRINCIPAL-ID=f.e. a GUID like in AAD
X-MS-CLIENT-PRINCIPAL-IDP=Identity Provider (AAD => aad)
X-MS-TOKEN-AAD-ID-TOKEN=in AAD the JWT Token with additional claims, that you also can find in ClaimsPrincipal.Current.Claims if you happen to run the application in ASP.NET
Step 1 Configure your AAD & securing your Web APP/API
After you have created a new AAD instance like <yourChoosenName>.onmicrosoft.com you can define an AAD application which your application will be using. Under Applications Tab
- Add new application “Add an application that my organization is developing”
- Name it and select “Web Application and/or WEB API”
- Provide the sign-in url which will be the URL to your website like: https://<yourapp>.azurewebsites.net
- Provide an unique ID which can be any unique URI, but for multitenant applications use the base tenant uri in combination like so: https://<yourTenantName>.onmicrosoft.com/<your unique name of the app>
After you have created the application you will find also populated the REPLY URL which is important as the JWT Token will be sent only to this URL by the identity provider! To configure Authentication/Authorization for your Web APP/API:
- copy Client ID of your AAD Application
- Open “View Endpoints” (button on the bottom of the screen) – Copy the URL of the Federation Metadata Document
Open the Federation Metadata Document URL in a browser
In the XML find the element “Entity” and copy the content of the attribute “entityID” which contains the link to the Issuer (Issuer URL)
You will need these two values to configure Authentication/Authorization in your WebAPP/API like so:
Step 2 Applying this concept to my Sample Code
I figured out that I could create at least 2 different scenarios with my two Web APP/APIs:
- Assign Client and API to a single AAD applications
- Assign Client and API into separate AAD applications
With the first option I can easily authenticate my call into the API from my Client with the same identity that authenticated on the client (Implemented in the HomeController “Index_SameAAD”):
With the second option I can my Client App as Service Principal to authenticate to my API, which hides the original identity for the API.
(Implemented in the HomeController “Index”):
But I also can re-authenticate the identity on the API to see the original identity. I found this excellent article of Vittorio Bertocci on using ADAL’s AquireTokenByAuthorizationCode to call a Web API from a Web APP which showed me the way how to implement this.(Implemented in the HomeController “Index_OtherAAD”):
Step 3 – Clone the source
Feel free to clone my source code from my github repository and play with it.
You need to replace following placeholders with actual values and deploy & configure your apps to Azure of course.
- ”<your API MGMT API key>”
- <yourAPIMInstanceName>
- <yourcalcEnterpriseAPIwebsitesUrl>
- <yourAPIMInstanceName>
- <CalcEnterpriseClient AAD CLientID>
- <CalcEnterpriseClient AAD App Secret/Key>
- <CalcEnterpriseAPI AAD CLientID>
- <yourTenantName>
First restore all packages – For some reasons I had issues in the Calc-Project with not loading the correct DLL for System.Web.Http and others (funny enough it shows errors in Visual Studio 2015 but still compiles fine *lol*). Closing the Solutions and opening the Project-File instead fixes this.
Clone the Source
Download Slides
Enjoy a nice day – AndiP


