This is my personal favorite list of shortcuts in Visual Studio 2022 (German Keyboard)!
Enjoy Nina (So short, it could have been on Twitter *haha*)
This is my personal favorite list of shortcuts in Visual Studio 2022 (German Keyboard)!
Enjoy Nina (So short, it could have been on Twitter *haha*)
Here is my list of my most favorite Visual Studio Extensions! For my reference and as a guide to those seeking for such list!
Also if you like to learn some tips on tricks with Visual Studio I recommend joining my session on Visual Studio at ADC21 (German language).
Productivity Extensions
Build / Output Extensions
Visual Studio Themes
Enjoy!
yours Nina
About Hubspot
Let’s start from the beginning. What is HubSpot? HubSpot is a Marketing-, Sales-, Service, CMS and Operations-Software. Learn more about HubSpot here.
What I like in particular with HubSpot is the integration possibilities it offers. It has a rich API and also the capability to call webHooks among other things.
However there are two ways to authenticate against the HubSpot API
Hubspot itself disencourages you from using the API-Key other than for testing/developing purposes and given that an API-Key has no permissions attached to it and gives you control to almost everything in HubSpot you should never hand out the API-Key of a production system!
To develop applications you can register for a free developer account and sandbox for testing.
Concept and registration process of HubSpot Applications
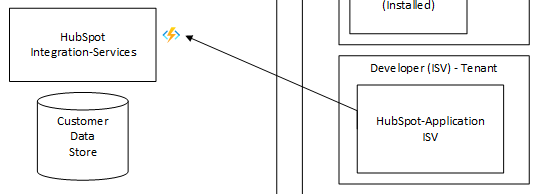
HubSpot allows ISV’s (independent software vendors) to write integrations and offer those as „Hubspot-Integration-Apps“ to all customers of HubSpot. Therefore your integration always must be multi-tenant per se. Although there are some „workarounds“ to only allow access to certain HubSpot-Tenants as we see later.
As an ISV you register an „HubSpot-Application“ inside your Developer Account with HubSpot. Here you will gain access to a so called „Installation-Url“ that you can offer your customers to install you Applications in their HubSpot-Tenants. If you also publish your HubSpot-Application to the HubSpot-Store all customers will see this integration and can choose to install your application.
As you can see in the illustration below „your“ ISV Application from your Developer-Tenant is installed in the tenants of Customers A and B. Customer C has not installed „your“ ISV Application.

So how does the „Install-Process“ actually work conceptually? While registering your HubSpot-Application (this process is quite straight forward) you need to provide an End-Point that HubSpot can call once a customer decides to install the application to their tenant.
You also declare what permissions you require at a minimum so your integration works properly (For example: Access to Contacts)
If the user clicks on the installation url (which by the way can contain additional optional permissions) they have to confirm that they want to give access to the application.
Then the endpoint (ISV) simply will receive an „CODE“ that must be redeemed to get an Access Token from HubSpot. The base code template for an Azure Function App would look like this:
[FunctionName("RegisterHubSpotApp")]
public async Task<IActionResult> RegisterHubSpotApp(
    [HttpTrigger(AuthorizationLevel.Anonymous, "get", Route = null)]
    HttpRequest req,
    ILogger log)
{
    try
    {
        var code = req.Query["code"].FirstOrDefault();
        if (!string.IsNullOrWhiteSpace(code))
        {
            // Redeem Code here!
        }
    }
    catch (Exception ex)
    {
        log.LogError(ex, ex.Message);
        return new BadRequestObjectResult(ex.Message);
    }
    return new BadRequestResult();
}
Unfortunately we still do not know which Customer Tenant did choose to install our application! The next step would be to acquire the Access-Token and Refresh-Token! Which still does not provide us with the information about the tenant!
Access-Token: This is the BEARER-Token you must use in the „Authorization„-Header when you make calls to the HubSpot-API. This will only be valid for a certain amount of time (see „ExpiresIn„-Field)
Refresh-Token: This is the token you must keep secure at all costs! Best to store it somewhere secure like Azure KeyVault. Having this token you can request new Access-Tokens that have expired! [SECURITY WARNING]
Said that to acquire the Access/Refresh-Token you need to provide following information that you can obtain from your registered HubSpot-Application:
A simple implementation in an Azure Function might look like this:
public class OAuthTokenResponse
    {
        [JsonProperty(PropertyName = "token_type")]
        public string TokenType { get; set; }
        [JsonProperty(PropertyName = "refresh_token")]
        public string RefreshToken { get; set; }
        [JsonProperty(PropertyName = "access_token")]
        public string AccessToken { get; set; }
        [JsonProperty(PropertyName = "expires_in")]
        public int ExpiresIn { get; set; }
    }

private const string HUBSPOT_TOKEN_API = "https://api.hubapi.com/oauth/v1/token";

private async Task<OAuthTokenResponse> GetOAuthToken(string code)
{
    HttpClient client = _httpFactory.CreateClient();

    List<KeyValuePair<string, string>> data = new List<KeyValuePair<string, string>>()
        {
            new KeyValuePair<string, string>("grant_type","authorization_code"),
            new KeyValuePair<string, string>("client_id",_config["clientID"]),
            new KeyValuePair<string, string>("client_secret",_config["clientSecret"]),
            new KeyValuePair<string, string>("redirect_uri", _config["RedirectUri"]),
            new KeyValuePair<string, string>("code", code)
        };
    HttpRequestMessage httpRequest = new HttpRequestMessage
    {
        RequestUri = new Uri(HUBSPOT_TOKEN_API),
        Content = new FormUrlEncodedContent(data),
        Method = HttpMethod.Post
    };
    HttpResponseMessage httpResponse = await client.SendAsync(httpRequest);
    if (httpResponse.IsSuccessStatusCode)
    {
        var token = JsonConvert.DeserializeObject<OAuthTokenResponse>(await httpResponse.Content.ReadAsStringAsync());
        if (token != null && !string.IsNullOrWhiteSpace(token.RefreshToken))
        {
            return token;
        }
    }
    else
    {
        var response = await httpResponse.Content.ReadAsStringAsync();
    }
    return null;
}
So there is a lot of effort to be done and still we have no idea which Tenant has requested the install! Fortunately we can use the RefreshToken (keep in mind to keep it secure!) to retrieve some information about it.
The result of this API Call will look like this:
{
  "token": "xxxxxxxx-xxxx-xxxx-xxxx-xxxxxxxxxxxx",
  "user": "test@hubspot.com",
  "hub_domain": "demo.hubapi.com",
  "scopes": [
    "automation",
    "contacts",
    "oauth"
  ],
  "hub_id": 62515,
  "client_id": "yyyyyyyy-yyyy-yyyy-yyyy-yyyyyyyyyyyy",
  "user_id": 123,
  "token_type": "refresh"
}
and gives us information about
You might have noticed using Hubspot that the „hub_id“ is always a part of the URL. Example of an url to a contact:
An implementation in Azure Functions might look like this:
private async Task<OAuthRefreshTokenInfo> GetRefreshTokenInfo(string refreshToken)
{
    HttpClient client = _httpFactory.CreateClient();

    HttpResponseMessage tokenInfoResponse = await client.GetAsync(string.Format("https://api.hubapi.com/oauth/v1/refresh-tokens/{0}", refreshToken));
    if (tokenInfoResponse.IsSuccessStatusCode)
    {
        OAuthRefreshTokenInfo tokenInfo = JsonConvert.DeserializeObject<OAuthRefreshTokenInfo>(await tokenInfoResponse.Content.ReadAsStringAsync());
        if (tokenInfo.ClientId == _config["clientID"])
        {
            return tokenInfo;
        }
    }
    return null;
}
After we do have AccessToken, RefreshToken and Tenant-Information we need to store the Refresh-Token together with the Tenant-Information so our integration application can use this information to create an AccessToken on demand.
Make sure you cache the AccessToken securely to prevent unnecessary round-trips in your integration. And make sure the RefreshToken is stored securely (f.e. Azure KeyVault)!
Thanks and enjoy
Nina
Today I show you step by step how you can use Azure Active Directory Business to Consumer (AAD B2C) to secure your backend site/services.
For that reason I create a service backend and two web applications:
Both applications will be able to access the web-api after the user is authenticated. The following diagram illustrates our example:

First of all we will create our required infrastructure:
| SPA-App | Web-API | ASP.NET Core App | |
|---|---|---|---|
| Name | b2cspaspec* | b2ctestspecapi* | b2ctestspec* |
| Runtime | Node 12 (LTS) | .NET Core 3.1 | .NET Core 3.1 |
| Plan | YourFreePlan-1 | YourFreePlan-1 | YourFreePlan-1 |
| https://b2cspaspec.azurewebsites.net/ | https://b2ctestspecapi.azurewebsites.net/ | https://b2ctestspec.azurewebsites.net/ |
*) These names are already taken, choose unique names!
| Git-Clone Url | https://b2cspaspec.scm.azurewebsites.net:443/b2cspaspec.git |
|---|---|
| Username | $b2cspaspec |
| Password | av********cs |
Copy the Git Clone URL and store the git credentials
Next we will create a new Azure Active Directory B2C Tenant. You can skip that step if you already have one.
Navigate to the AAD B2C Overview page
Select New user flow under Policies / UserFlows to select a predefined user flow. We select Sign up and sign in in the recommended version. This will allow a potential user to sign up and in, or an existing user to sign in.
Configure the flow as so:
Click CREATE to create the flow. Under User Flows select your flow again and click on Properties as we want to modify the password complexity.
I choose the following settings, but you can obviously choose different:
Each of our services (2 webapps and 1 webapi) need to be secured and therefore represented as AAD applications in our B2C tenant.
Again navigate to the AAD B2C Overview page and select App registrations
Name: b2ctestspecapi
Supported account type: Accounts in any identity provider or organizational directory (for authenticating users with user flows)
Redirect URI: Web – https://b2ctestspecapi.azurewebsites.net/.auth/login/aad/callback (Enter you WebApp URI there and append /.auth/login/aad/callback which will be the path EasyAuth of Azure App Service will require!)
Under Overview note the Application (Client) ID (af9c********0f66 in my case)
Under Manage / Authentication / Implicit Grant
Under Manage / Certificates & secrets / Client Secrets
Under Manage / API permissions add following permissions (Do not forget to GRANT CONSENT afterwards)
Under Manage / Expose an API
Name: b2ctestspec
Supported account type: Accounts in any identity provider or organizational directory (for authenticating users with user flows)
Redirect URI: Web – https://b2ctestspec.azurewebsites.net/.auth/login/aad/callback (Enter you WebApp URI there and append /.auth/login/aad/callback which will be the path EasyAuth of Azure App Service will require!)
Under Overview note the Application (Client) ID (cf6d********d2ee in my case)
Under Manage / Authentication / Implicit Grant
Under Manage / Certificates & secrets / Client Secrets
Under Manage / API permissions add following permissions if not present(Do not forget to GRANT CONSENT afterwards)
Name: spademo
Supported account type: Accounts in any identity provider or organizational directory (for authenticating users with user flows)
Redirect URI: Single-page application SPA – https://b2cspaspec.azurewebsites.net/ (We will use MSAL here)
Under Overview note the Application (Client) ID (9192********fe5 in my case)
Under Manage / Authentication / Platform Configurations
Under Manage / Authentication / Implicit Grant
Under Manage / API permissions add following permissions if not present(Do not forget to GRANT CONSENT afterwards)
Again navigate to the AAD B2C Overview page and select B2C_1_signupin policy under Policies/User Flows. Click on the Run user flow button and select the spademo application. As reply url choose https://jwt.ms so we can examine the result. Select no access token ressources now. Click Run user flow
You should see a SignIn/SignUp Dialog – Create a new user with one of your EMail-Addresses. Once you hit create you should be redirected to https://jwt.ms where you can examine you Auth-Token.
Since the best security code is the code you never write, we want to make use of Azure Apps Easy Auth service to protect our ASP.NET Core App and Service.
For this switch back into your regular tenant (where the Azure Apps are located). To view all App Services in your tenant click this link.
First we configure EasyAuth for our API app service. Then we create a simple api application that we deploy there.
Navigate to your b2ctestspecapi App Service.
Under Settings – Authentication/Authorization enable App Service Authentication. Also enable the Token Store (at the end of the page). Select Login with Azure Active Directory as action. This will ensure that no unauthenticated call is reaching your application.
Select Azure Active Directory from the list of Authentication Providers Under the Managment Mode click on Advanced
Create a simple ASP.NET Core App AADDemoAPI in Visual Studio which automatically will have the WeatherForeCast API implemented. Deploy this service to this Azure App Service.
Test the authentication by navigating to https://b2ctestspecapi.azurewebsites.net which should require a login. Once you have logged in you should be able to examine the tokens by accessing: https://b2ctestspecapi.azurewebsites.net/.auth/me
Navigate to your b2ctestspec App Service.
Under Settings – Authentication/Authorization enable App Service Authentication. Also enable the Token Store (at the end of the page). Select Login with Azure Active Directory as action. This will ensure that no unauthenticated call is reaching your application. If you want to serve some pages without authenticating choose the other option. In this case however you need to check in you code if you are authenticated or not! If not you have to make sure to redirect the user to the login page.
Select Azure Active Directory from the list of Authentication Providers Under the Managment Mode click on Advanced
This should do the trick right? Well as long as we want only to authenticate this will work. But if we also want the access token to access our WebAPI we need to do more.
Right no configuration in the UI where you can specify the required permission scopes. To request the scopes you have to redirect users to this url:
There is however a workaround to this i stumbled upon in the documentation. Using the mangement API you can set the default scopes for EasyAuth. If you want to use an UI to do that use https://ressources.azure.com and navigate to subscriptions/yoursubscription/resourceGroups/yourResourceGroup/providers/Microsoft.Web/sites/yourSite/config/authsettings. Under the entry allowedaudiences add:
"additionalLoginParams": [
	  "resource=af9c************0f66",
	  "scope=openid offline_access https://spectologicb2crtm.onmicrosoft.com/specapi/Spec.Read https://spectologicb2crtm.onmicrosoft.com/specapi/Spec.Write"
	]
Let’s now implement an ASP.NET Core Application that we can deploy to this Azure App Service and will call the API webservice we created earlier.
In Visual Studio 2019 create a new ASP.NET Core MVC app named AADDemoWF and implement the Index-Method of HomeController.cs
public async Task Index()
{
    ViewData["X-MS-TOKEN-AAD-ID-TOKEN"] = Request.Headers["X-MS-TOKEN-AAD-ID-TOKEN"];
    ViewData["X-MS-TOKEN-AAD-ACCESS-TOKEN"] = Request.Headers["X-MS-TOKEN-AAD-ACCESS-TOKEN"];
    ViewData["X-MS-TOKEN-AAD-EXPIRES-ON"] = Request.Headers["X-MS-TOKEN-AAD-EXPIRES-ON"];
    ViewData["X-MS-TOKEN-AAD-REFRESH-TOKEN"] = Request.Headers["X-MS-TOKEN-AAD-REFRESH-TOKEN"];

    string accessToken = Request.Headers["X-MS-TOKEN-AAD-ACCESS-TOKEN"];
    try
    {
        string url = "https://b2ctestspecapi.azurewebsites.net/weatherforecast";
        HttpRequestMessage request = new HttpRequestMessage(HttpMethod.Get, url);
        request.Headers.Add("Authorization", $"Bearer {accessToken}");
        var response = await _client.SendAsync(request);
        ViewData["SERVICERESP"] = await response.Content.ReadAsStringAsync();

    }
    catch (Exception ex)
    {
        ViewData["SERVICERESP"] = ex.ToString();
    }
    return View();
}
Also adapt the index.cshtml page to visualize the tokens and the service response.
@{
    ViewData["Title"] = "Home Page";
}

<div class="text-center">
<h1 class="display-4">Auth Tokens</h1>
<div>X-MS-TOKEN-AAD-ID-TOKEN</div><br />
<div>X-MS-TOKEN-AAD-ACCESS-TOKEN</div><br />
<div>X-MS-TOKEN-AAD-EXPIRES-ON</div><br />
<div>X-MS-TOKEN-AAD-REFRESH-TOKEN</div><br />
<div>SERVICERESP</div><br />

<a href="https://b2ctestspec.azurewebsites.net/.auth/login/aad?p=&post_login_redict_uri=/&scope=openid+offline_access+https%3A%2F%2Fspectologicb2crtm.onmicrosoft.com%2Fspecapi%2FSpec.Read&redirect_uri=https%3A%2F%2Fb2ctestspec.azurewebsites.net%2F">Explicit</a>
</div>
Deploy this application to the App Service and you should be able to access this site after logging in through AAD B2
In this case I am using a sample provided by microsoft that we will adapt to our requirements. Open a terminal and clone the sample of microsoft.
First we will change app/authConfig.js. If you do not request all required resource permission scopes during login the silet token aquiring will fail and fall back to a authentication that will show a brief popup. Since the user is logged on already this will just result in a brief flicker. To avoid this we add all base scopes in the initial login.
// Config object to be passed to Msal on creation.
// For a full list of msal.js configuration parameters,
// visit https://github.com/AzureAD/microsoft-authentication-library-for-js/blob/dev/lib/msal-browser/docs/configuration.md

const msalConfig = {
    auth: {
        clientId: "9192**************0fe5",
        authority: "https://spectologicb2crtm.b2clogin.com/spectologicb2crtm.onmicrosoft.com/B2C_1_signupin",
        knownAuthorities: [ 'spectologicb2crtm.b2clogin.com' ],
        redirectUri: "https://b2cspaspec.azurewebsites.net/",
    },
    ...

// Add here the scopes that you would like the user to consent during sign-in
const loginRequest = {
    scopes: ["openid","offline_access","https://spectologicb2crtm.onmicrosoft.com/specapi/Spec.Read"]
};

// Add here the scopes to request when obtaining an access token for MS Graph API
const tokenRequest = {
    scopes: ["User.Read", "Mail.Read"],
    forceRefresh: false // Set this to "true" to skip a cached token and go to the server to get a new token
};

const weatherTokenRequest = {
    scopes: ["https://spectologicb2crtm.onmicrosoft.com/specapi/Spec.Read"],
    forceRefresh: false // Set this to "true" to skip a cached token and go to the server to get a new token
};
Change app/graphConfig.js and add weatherConfig there:
// Add here the endpoints for MS Graph API services you would like to use.
const graphConfig = {
    graphMeEndpoint: "https://graph.microsoft.com/v1.0/me",
    graphMailEndpoint: "https://graph.microsoft.com/v1.0/me/messages",
};
...
// Add here the endpoints for Weather services you would like to use.
const weatherConfig = {
    weatherEndpoint: "https://b2ctestspecapi.azurewebsites.net/weatherforecast"
};
Add a function callWeatherAPI to app/graph.js. The code just makes a request to an given endpoint with a bearertoken.
function callWeatherAPI(endpoint, token, callback) {
    console.log(endpoint);
    console.log(token);
    const headers = new Headers();
    const bearer = `Bearer ${token}`;

    headers.append("Authorization", bearer);

    const options = {
        method: "GET",
        headers: headers
    };

    console.log('request made to Weather API at: ' + new Date().toString());

    fetch(endpoint, options)
        .then(response => response.json())
        .then(response => callback(response, endpoint))
        .catch(error => console.log(error));
}
Change app/authPopup.js and adapt the seeProfile-Method that is called once a user clicks on the Profile-Button
...
function seeProfile() {
    getTokenPopup(weatherTokenRequest).then(response => {
        callWeatherAPI(
            weatherConfig.weatherEndpoint,
            response.accessToken,
            updateUI);
    }).catch(error => {
        console.error(error);
    });
}
...
The upper method will call updateUI-function after a successful call to the webservice. We change the implementation in app/ui.js
...
function updateUI(data, endpoint) {
    console.log('Graph API responded at: ' + new Date().toString());

    if (endpoint === weatherConfig.weatherEndpoint) {
        const dataElement = document.createElement('p');
        dataElement.innerHTML = "<strong>Data: </strong>" + JSON.stringify(data);
        profileDiv.appendChild(dataElement);
    } else if (endpoint === graphConfig.graphMeEndpoint) {
        const title = document.createElement('p');
...
We are almost done now. We need to change Server.js to serve the right port for Azure App Service:
// app.listen(port); Replace this line with the next
app.listen(process.env.PORT||port);
Check in all changes to master in this git repository!
Now deploy our git repository to our NODE Azure App Service by using the credentials we created earlier.
Now you can try your service at https://b2cspaspec.azurewebsites.net/
That’s it for today! Have a great day!
AndiP
Welcome to the eigth and final post (0-7) of a series that will show you how you can write a Microsoft Teams Application with Blazor Webassembly.
You will find the complete source code in this github repository. I placed my changes in different branches so you can easily jump in at any time.
In this post we will secure our WeatherForeCast API in the Blazor-Server project and access it the same way we did with Microsoft Graph.
Click +New registration to register a new AAD application. Replace https://demo.ngrok.io with your own domain.
and click Register.
Make sure to copy your Application (Client) ID and store it for later. I am using the following Client-ID throughout the samples which need to be replaced with yours: 38a06d0f-e38d-4e93-be39-aa42d8ebe604
IMPORTANT
Microsoft Teams will only allow URLs that are in the premitted domain. Make sure that you use your NGROK or registered domain here!
Select Expose an API under the Manage section and set an application ID Uri. You can reuse the given UID from the proposed App ID Uri. For example:
Now select +Add a scope to add the required "access_as_user" scope:
Finally click Add scope to add the scope. You will get an url that looks like this:
To directly allow Teams to access we add the well known client IDs of the Microsoft Teams-Applications. There are two of them: Microsoft Teams Web Client and Microsoft Teams Desktop Client
Use the +Add a client application button to add the following client ids. You need to also select the scope "access_as_user" so that the Teams-Apps can access this specific scope!
Open the BlazorApp AAD application
Click on API permissions under the Manage section to add permissions to access our webservice. We do want to add delegated permissions (permissions in the context of the user). To add the following permission click + Add a permission and select My APIs / BlazorService and select delegated permissions:
Afer clicking save make sure to click Grant admin consent for … button to grant these permissions within this tenant. So all users of this tenant do not have to explicitly consent to your MS-Teams App.
In BlazorTeamApp.Server project add following configuration to the appsettings.json file:
"AzureAd": {
  "Instance": "https://login.microsoftonline.com/",
  "ClientId": "38a06d0f-e38d-4e93-be39-aa42d8ebe604",
  "TenantId": "common",
  "Audience": "api://demo.ngrok.io/38a06d0f-e38d-4e93-be39-aa42d8ebe604",
  "Issuer": "https://sts.windows.net/c409088f-0d18-498f-8ece-8659ea219c20/"
}
Add following nuget package to BlazorTeamApp.Server:
In Startup.cs modify the method ConfigureService to add authentication:
public void ConfigureServices(IServiceCollection services)
{
    services.AddAuthentication(sharedOptions =>
    {
        sharedOptions.DefaultScheme = AzureADDefaults.AuthenticationScheme;
    }).AddJwtBearer("AzureAD", options =>
    {
        options.Audience = Configuration.GetValue<string>("AzureAd:Audience");
        options.Authority = Configuration.GetValue<string>("AzureAd:Instance")
            + Configuration.GetValue<string>("AzureAd:TenantId");
        options.TokenValidationParameters = new
            Microsoft.IdentityModel.Tokens.TokenValidationParameters()
            {
                ValidIssuer = Configuration.GetValue<string>(
                    "AzureAd:Issuer"),
                ValidAudience = Configuration.GetValue<string>(
                    "AzureAd:Audience")
            };
    });

    services.AddControllersWithViews();
    services.AddRazorPages();
    services.AddTokenProvider();
}
Also in Startup.cs modify the method Configure(IApplicationBuilder,…:
public void Configure(IApplicationBuilder app, IWebHostEnvironment env)
{
    ...
    app.UseAuthentication();    // Add this line here
    // app.UseHttpsRedirection();
    app.UseBlazorFrameworkFiles();
    app.UseStaticFiles();
    app.UseRouting();
    app.UseAuthorization();    // Add this line here
    app.UseEndpoints(endpoints =>
    {
      ...
Now use the Authorize attribute to secure our WeatherForeCast controller by adapting Controllers/WeatherForeCastController.cs
...
namespace BlazorTeamApp.Server.Controllers
{
    [Authorize]     // Add this line
    [ApiController]
    [Route("[controller]")]
    public class WeatherForecastController : ControllerBase
    {
        private static readonly string[] Summaries = new[]
...
If you now start your application in Visual Studio and try to access this url:
you should receive a 401 error!
Since we have written all the necessary code before we can simply add a new button to our razor page and call our GetServerToken method to get an access token for our weather api:
Add this button to your Tab.razor page
<br  />
<button class="btn btn-light"  @onclick="GetWeatherServerAuthToken">Get Weather Server-Token</button>
Implement the button handler in Tab.razor
private string weatherAuthServerToken = string.Empty;
private async Task GetWeatherServerAuthToken()
{
    try
    {
        authServerToken = await TeamsClient.GetServerToken(authToken,
           new string[1] { "api://spectologic.eu.ngrok.io/38a06d0f-e38d-4e93-be39-aa42d8ebe604/weather_api" });
    }
    catch (Exception ex)
    {
        authServerToken = $"Fehler: {ex.Message}";
    }
}
I leave implementing the call to the webservice with the gained token up to you. It is done the same way as we have called the Microsoft Graph me-Endpoint.
That’s it, have a great day
AndiP
Welcome to the seventh post (0-6) of a series that will show you how you can write a Microsoft Teams Application with Blazor Webassembly.
You will find the complete source code in this github repository. I placed my changes in different branches so you can easily jump in at any time.
In this post we will extend our library, so that we are able to create access tokens to access the Microsoft Graph.
We create a new method that will take the ClientAuthToken and scopes of apis we want to access. We obtain the Tenant-ID from the MS-Teams context and send this to our backend (/auth/token) which will use application (client)id and client secret to create an access token:
 GetServerToken(clientSideToken: string, scopes: string[]): Promise<string> {
	try {
		const promise = new Promise<string>((resolve, reject) => {
			microsoftTeams.getContext((context) => {
				fetch('/auth/token', {
					method: 'post',
					headers: {
						'Content-Type': 'application/json'
					},
					body: JSON.stringify({
						'tid': context.tid,
						'token': clientSideToken,
						'scopes': scopes
					}),
					mode: 'cors',
					cache: 'default'
				})
					.then((response) => {
						if (response.ok) {
							return response.json();
						} else {
							reject(response.statusText);
						}
					})
					.then((responseJson) => {
						if (responseJson.error) {
							reject(responseJson.error);
						} else {
							const serverSideToken = responseJson;
							console.log(serverSideToken);
							resolve(serverSideToken);
						}
					});
			});

		});
		return promise;
	}
	catch (err) {
		alert(err.message);
	}
}
Since we do want to call this method from our Blazor components we add additional methods to our JavaScript-Wrapper interface/class:
ITeamsClient
using System.Threading.Tasks;

namespace SpectoLogic.Blazor.MSTeams
{
    public interface ITeamsClient
    {
        ValueTask<string> GetClientToken();
        ValueTask<string> GetServerToken(string clientToken, string[] scopes);
        ValueTask<string> GetUPN();
    }
}
TeamsClient
using Microsoft.JSInterop;
using System.Threading.Tasks;

namespace SpectoLogic.Blazor.MSTeams
{
    public class TeamsClient : ITeamsClient
    {
        public TeamsClient(IJSRuntime jSRuntime)
        {
            _JSRuntime = jSRuntime;
        }
        private readonly IJSRuntime _JSRuntime;

        public ValueTask<string> GetUPN() =>
            _JSRuntime.InvokeAsync<string>(MethodNames.GET_UPN_METHOD);
        public ValueTask<string> GetClientToken() =>
            _JSRuntime.InvokeAsync<string>(MethodNames.GET_CLIENT_TOKEN_METHOD);

        public ValueTask<string> GetServerToken(
            string clientToken, string[] scopes) => _JSRuntime.InvokeAsync<string>(MethodNames.GET_SERVER_TOKEN_METHOD, clientToken, scopes);

        private class MethodNames
        {
            public const string GET_UPN_METHOD
                = "BlazorExtensions.SpectoLogicMSTeams.GetUPN";
            public const string GET_CLIENT_TOKEN_METHOD
                = "BlazorExtensions.SpectoLogicMSTeams.GetClientToken";
            public const string GET_SERVER_TOKEN_METHOD
                = "BlazorExtensions.SpectoLogicMSTeams.GetServerToken";
        }
    }
}
Add the following nuget packages to SpectoLogic.Blazor.MSTeams.csproj
Create a new subfolder auth within the project and add following classes:
TokenResponse.cs This class reassembles the token reference we get back from the OAuth endpoint.
using System.Text.Json.Serialization;

namespace SpectoLogic.Blazor.MSTeams.Auth
{
    public class TokenResponse
    {
        [JsonPropertyName("token_type")]
        public string TokenType { get; set; }
        [JsonPropertyName("scope")]
        public string Scope { get; set; }
        [JsonPropertyName("expires_in")]
        public int ExpiresIn { get; set; }
        [JsonPropertyName("ext_expires_in")]
        public int ExtExpiresIn { get; set; }
        [JsonPropertyName("access_token")]
        public string AccessToken { get; set; }
    }
}
TokenError.cs This class reassembles an error that we might get back from the OAuth endpoint. If for example we did not grant consent to our tenant and the user has not granted consent so far we will retrieve an error like ‚invalid_grant‘.
using System.Text.Json.Serialization;

namespace SpectoLogic.Blazor.MSTeams.Auth
{
    public class TokenError
    {
        /// <summary>
        /// May include things like "invalid_grant"
        /// </summary>
        [JsonPropertyName("error")]
        public string Error { get; set; }
        [JsonPropertyName("error_description")]
        public string Description { get; set; }
        [JsonPropertyName("error_codes")]
        public int[] Codes { get; set; }
        [JsonPropertyName("timestamp")]
        public string Timestamp { get; set; }
        [JsonPropertyName("trace_id")]
        public string TraceId { get; set; }
        [JsonPropertyName("correlation_id")]
        public string CorrelationId { get; set; }
        [JsonPropertyName("error_uri")]
        public string ErrorUri { get; set; }
    }
}
ITokenProvider.cs The interface for our server-side helper class that encapsulates the retrieval of the access token.
using System.Threading.Tasks;

namespace SpectoLogic.Blazor.MSTeams.Auth
{
    public interface ITokenProvider
    {
        Task<TokenResponse> GetToken(
            string tenantId,
            string token,
            string clientId,
            string clientSecret,
            string[] scopes);
    }
}
ITokenErrorException.cs An exception that will be thrown by the TokenProvider implementation, if we receive an error response from the OAuth Endpoint.
using System;
using System.Runtime.Serialization;

namespace SpectoLogic.Blazor.MSTeams.Auth
{
    public class TokenErrorException : Exception
    {
        public TokenError TokenError { get; set; }

        public TokenErrorException()
        {
        }

        public TokenErrorException(TokenError error) : base(error.Error)
        {
            TokenError = error;
        }

        public TokenErrorException(TokenError error, Exception innerException) : base(error.Error, innerException)
        {
            TokenError = error;
        }

        protected TokenErrorException(SerializationInfo info, StreamingContext context) : base(info, context)
        {
        }
    }
}
Tokenprovider.cs The implementation of our token provider accessing the Token-Endpoint. Future implementations should use the MSAL-Library from Microsoft, but for illustration purposes this should suffice:
using System.Collections.Generic;
using System.Net.Http;
using System.Text.Json;
using System.Threading.Tasks;

namespace SpectoLogic.Blazor.MSTeams.Auth
{
    public class TokenProvider : ITokenProvider
    {
        private readonly IHttpClientFactory _clientFactory;

        public TokenProvider(IHttpClientFactory clientFactory)
        {
            _clientFactory = clientFactory;
        }

        public async Task<TokenResponse> GetToken(
            string tenantId,
            string token,
            string clientId,
            string clientSecret,
            string[] scopes)
        {
            string requestUrlString =
            $"https://login.microsoftonline.com/{tenantId}/oauth2/v2.0/token";

            Dictionary<string, string> values = new Dictionary<string, string>
            {
                { "client_id", clientId },
                { "client_secret", clientSecret },
                { "grant_type", "urn:ietf:params:oauth:grant-type:jwt-bearer" },
                { "assertion", token },
                { "requested_token_use", "on_behalf_of" },
                { "scope", string.Join(" ",scopes) }
            };
            FormUrlEncodedContent content = new FormUrlEncodedContent(values);

            HttpClient client = _clientFactory.CreateClient();
            HttpResponseMessage resp = await client.PostAsync(
                requestUrlString, content);

            if (resp.IsSuccessStatusCode)
            {
                string respContent = await resp.Content.ReadAsStringAsync();
                return JsonSerializer.Deserialize<TokenResponse>(respContent);
            }
            else
            {
                string respContent = await resp.Content.ReadAsStringAsync();

                TokenError tokenError =
                    JsonSerializer.Deserialize<TokenError>(respContent);

                throw new TokenErrorException(tokenError);
            }
        }
    }
}
TokenProviderExtensions And finally some class to implement the extension method which can be used by the server project to provide the classes via DI.
using Microsoft.Extensions.DependencyInjection;

namespace SpectoLogic.Blazor.MSTeams.Auth
{
    public static class TokenProviderExtensions
    {
        public static IServiceCollection AddTokenProvider(
            this IServiceCollection services)
            => services.AddScoped<ITokenProvider, TokenProvider>()
                .AddHttpClient();
    }
}
Now let’s use this library in our Backend to implement the /auth/token service.
First of all add a reference of our razor library to the BlazorTeamTab.Server project.
Extend Startup.cs to call the extension method that will provider the necessary classes via DI:
...
using SpectoLogic.Blazor.MSTeams.Auth; // Add this line
...
services.AddRazorPages();
services.AddTokenProvider(); // Add this line
...
Add a folder Dtos and add the class TokenRequest to it. This reassembles the structure we receive from our typescript implementation:
using System.Text.Json.Serialization;

namespace SpectoLogic.Blazor.MSTeams.Auth
{
    public class TokenRequest
    {
        [JsonPropertyName("tid")]
        public string Tid { get; set; }
        [JsonPropertyName("token")]
        public string Token { get; set; }
        [JsonPropertyName("scopes")]
        public string[] Scopes { get; set; }
    }
}
Under Server/Controllers create a new file AuthController.cs We add ClientID/ClientSecret from our AAD-Application hardcoded! Do NOT do that in production code! Never store secrets in code! Use Azure KeyVault or other more secure locations.
using Microsoft.AspNetCore.Mvc;
using Microsoft.Extensions.Logging;
using SpectoLogic.Blazor.MSTeams.Auth;
using System;
using System.Threading.Tasks;

namespace BlazorTeamApp.Server.Controllers
{
    [ApiController]
    [Route("[controller]/[action]")]
    public class AuthController : ControllerBase
    {
        private readonly ILogger<AuthController> logger;
        private readonly ITokenProvider tokenProvider;

        public AuthController(
            ILogger<AuthController> logger,
            ITokenProvider tokenProvider)
        {
            this.logger = logger;
            this.tokenProvider = tokenProvider;
        }

        [HttpPost]
        [ActionName("token")]
        public async Task<IActionResult> Token(
            [FromBody] TokenRequest tokenrequest)
        {
            string clientId = "e2088d72-79ce-4543-ab3c-0988dfecf2f1";
            // From Step 4
            string clientSecret = "_2xb_7h-P1voxOddv4jzaE8I_l-Tx71BlH";
            // From Step 4
            try
            {
                TokenResponse tokenResponse = await tokenProvider.GetToken(
                        tokenrequest.Tid,
                        tokenrequest.Token,
                        clientId,
                        clientSecret,
                        tokenrequest.Scopes);
                return new JsonResult(tokenResponse.AccessToken);
            }
            catch (TokenErrorException tokenErrorEx)
            {
                return new JsonResult(tokenErrorEx.TokenError);
            }
            catch (Exception)
            {
                throw;
            }
        }
    }
}
Since we do want to do HTTP-Requests lets add the HTTP-Client in Startup.cs
using SpectoLogic.Blazor.MSTeams;
...
builder.Services.AddMSTeams();
builder.Services.AddHttpClient(); // add this line!

await builder.Build().RunAsync();
...
Now implement Tab.razor page. We inject the HttpClientFactory and add two new methods to handle our two new buttons.
One will receive the server auth token for Microsoft Graph, where the other will use that token to fetch some basic user informations from the Graph.
@page "/tab"
@inject SpectoLogic.Blazor.MSTeams.ITeamsClient TeamsClient;
@inject IHttpClientFactory HttpFactory;

<h1>Counter</h1>

<p>Current count: @currentCount</p>
<p>Current User: @userName</p>
<p>AuthToken: @authToken</p>
<p>Server Token: @authServerToken</p>
<p>User Data: @userData</p>

<button class="btn btn-primary"  @onclick="IncrementCount">Click me</button>
<button class="btn btn-primary"  @onclick="GetUserName">Get UserName</button>
<br  />
<button class="btn btn-light"  @onclick="GetAuthToken">Get Auth-Token</button>
<button class="btn btn-light"  @onclick="GetServerAuthToken">Get Server-Token</button>
<button class="btn btn-light"  @onclick="GetUserData">Get User Data</button>

@code {

    private int currentCount = 0;
    private string userName = string.Empty;

    private void IncrementCount()
    {
        currentCount++;
    }

    private async Task GetUserName()
    {
        userName = await TeamsClient.GetUPN();
    }
    private string authToken = string.Empty;

    private async Task GetAuthToken()
    {
        authToken = await TeamsClient.GetClientToken();
    }

    private string authServerToken = string.Empty;

    private async Task GetServerAuthToken()
    {
        try
        {
            authServerToken = await TeamsClient.GetServerToken(
                authToken,
                new string[1] { "https://graph.microsoft.com/User.Read" });
        }
        catch (Exception ex)
        {
            authServerToken = $"Fehler: {ex.Message}";
        }
    }

    private string userData = string.Empty;
    private async Task GetUserData()
    {
        try
        {
            var client = HttpFactory.CreateClient();
            HttpRequestMessage request = new HttpRequestMessage()
            {
                Method = HttpMethod.Get,
                // https://graph.microsoft.com/v1.0/me/mailFolders('Inbox')/messages?$select=sender,subject&$top=2
                RequestUri = new Uri("https://graph.microsoft.com/v1.0/me/")
            };
            request.Headers.Authorization = new System.Net.Http.Headers.AuthenticationHeaderValue("Bearer", authServerToken);
            authToken = $"Bearer {authServerToken}";
            var response = await client.SendAsync(request);
            userData = await response.Content.ReadAsStringAsync();
        }
        catch (Exception ex)
        {
            userData = $"Fehler: {ex.Message}";
        }
    }
}
In our final post for this series tomorrow, we will secure the Weatherforecast API and reuse what we have learned so far to access the secured service.
That’s it for today! See you tomorrow!
AndiP
Welcome to the sixth post (0-5) of a series that will show you how you can write a Microsoft Teams Application with Blazor Webassembly.
You will find the complete source code in this github repository. I placed my changes in different branches so you can easily jump in at any time.
In this post we will put our test code into a library, so that we can reuse our work in future projects. I oriented myself on an existing github project called BlazorExtensions/Storage to build this library.
Add a new project (of type: Razor Class Library) to your solution. I name it "SpectoLogic.Blazor.MSTeams":
Add a folder Client in the project and add a typescript file named SpectoLogic.Blazor.MSTeams.ts (Feel free to adapt naming to what suits you best).
Add the nuget package Microsoft.TypeScript.MSBuild to the project.
Create a new Typescript JSON Configuration File and configure it like this, since we need promises and AMD (Asynchronous module definition).
{
  "compilerOptions": {
    "noImplicitAny": false,
    "noEmitOnError": true,
    "removeComments": false,
    "sourceMap": true,
    "module": "AMD",
    "target": "ES2016",
    "outDir": "wwwroot"
  },
  "exclude": [
    "node_modules",
    "wwwroot"
  ]
}
If you compile your solution the file SpectoLogic.Blazor.MSTeams.js should be generated and placed in the wwwroot folder.
Unfortunatly you cannot add libman directly to your project. Therefore just copy libman.json from your BlazorTeamApp.Client project and insert it to your new library project.
Change libman.json as so:
{
  "version": "1.0",
  "defaultProvider": "cdnjs",
  "libraries": [

    {
      "provider": "jsdelivr",
      "library": "@microsoft/teams-js@1.8.0",
      "destination": "Client/external/teams"
    }
  ]
}
Let’s implement Spectologic.Blazor.MSTeams.ts! This is basically all the javascript code we wrote before in index.html in a typescript class
import { Context } from "@microsoft/teams-js";

interface SpectoLogicTeamsInterface {
    Initialize(): void;
    GetUPN(): string;
    GetClientToken(): Promise<string>;
}

export class SpectoLogicTeams implements SpectoLogicTeamsInterface {

    private _context: Context;

    Initialize(): void {
        console.log("Initializing teams,...");
        try {
            microsoftTeams.initialize();
            microsoftTeams.getContext((context) => {
                this._context = context;
            });
        }
        catch (err) {
            alert(err.message);
        }
    }

    GetUPN(): string {
        return Object.keys(this._context).length > 0 ? this._context['upn'] : "";
    }

    GetClientToken(): Promise<string> {
        try {
                const promise = new Promise<string>((resolve, reject) => {

                    console.log("1. Get auth token from Microsoft Teams");

                    microsoftTeams.authentication.getAuthToken({
                        successCallback: (result) => {
                            resolve(result);
                        },
                        failureCallback: function (error) {
                            alert(error);
                            reject("Error getting token: " + error);
                        }
                    });

                });
            return promise;
        }
        catch (err) {
            alert(err.message);
        }
    }
}

export const blazorExtensions = 'BlazorExtensions';
// define what this extension adds to the window
// object inside BlazorExtensions
export const extensionObject = {
    SpectoLogicMSTeams: new SpectoLogicTeams()
};

export function Initialize(): void {
    if (typeof window !== 'undefined' && !window[blazorExtensions]) {
        // when the library is loaded in a browser
        // via a <script> element, make the
        // following APIs available in global
        // scope for invocation from JS
        window[blazorExtensions] = {
            ...extensionObject
        };
    }
    else {
        window[blazorExtensions] = {
            ...window[blazorExtensions],
            ...extensionObject
        };
    }
    let extObj: any;
    extObj = window['BlazorExtensions'];
    extObj.SpectoLogicMSTeams.Initialize();
}
Select the project properties of BlazorTeamApp.Client project and configure the TypeScript Build:
Then add a reference to SpectoLogic.Blazor.MSTeams project.
Add the requireJS library by adding this to the libman.js file:
{
  "provider": "cdnjs",
  "library": "require.js@2.3.6",
  "destination": "wwwroot/scripts/requirejs"
},
Replace the existing BlazorTeamApp.Client/wwwroot/index.html with this code which will initialize requireJS and call main.js:
<!DOCTYPE html>
<html>

<head>
    <meta charset="utf-8" />
    <meta name="viewport" content="width=device-width, initial-scale=1.0, maximum-scale=1.0, user-scalable=no" />
    <title>BlazorTeamApp</title>
    <base href="/" />
    <link href="css/bootstrap/bootstrap.min.css" rel="stylesheet" />
    <link href="css/app.css" rel="stylesheet" />
</head>

<body>
    <app>Loading...</app>

    <div id="blazor-error-ui">
        An unhandled error has occurred.
        <a href="" class="reload">
            Reload
        </a>
        <a class="dismiss">
            🗙
        </a>
    </div>
    <script src="_framework/blazor.webassembly.js">
    </script>
    <!-- Reference to the MS Teams Script added with libman -->

    <script src="scripts/teams/dist/MicrosoftTeams.js" />
    <script data-main="scripts/main" src="scripts/requirejs/require.js"/>
</body>
</html>
Create main.js under **BlazorTeamApp.Client/wwwroot/scripts/":
// Set up any config you need (you might not need this)
requirejs.config({
    basePath: "/scripts",
    paths: {
        "SpectoLogic.Teams": '/_content/SpectoLogic.Blazor.MSTeams/SpectoLogic.Blazor.MSTeams'
    }
}
);

// Tell RequireJS to load your main module (and its dependencies)
require(['require', 'SpectoLogic.Teams'], function (require) {
    var namedModule = require('SpectoLogic.Teams');
    namedModule.Initialize();
});
Open SpectoLogic.Blazor.MSTeams.csproj file in an editor and configure the language version to 8.0. Also Add the nuget package Microsoft.JSInterop:
...
<PropertyGroup>
    <TargetFramework>netstandard2.0</TargetFramework>
    <RazorLangVersion>3.0</RazorLangVersion>
    <LangVersion>8.0</LangVersion>
</PropertyGroup>
...
<PackageReference Include="Microsoft.JSInterop" Version="3.1.9" />
...
Now add a new file ITeamsClient.cs and definte it like so:
using System.Threading.Tasks;

namespace SpectoLogic.Blazor.MSTeams
{
    public interface ITeamsClient
    {
        ValueTask<string> GetClientToken();
        ValueTask<string> GetUPN();
    }
}
Implement the interface in a file TeamsClient.cs:
using Microsoft.JSInterop;
using System.Threading.Tasks;

namespace SpectoLogic.Blazor.MSTeams
{
    public class TeamsClient : ITeamsClient
    {
        public TeamsClient(IJSRuntime jSRuntime)
        {
            _JSRuntime = jSRuntime;
        }
        private readonly IJSRuntime _JSRuntime;

        public ValueTask<string> GetUPN() =>
          _JSRuntime.InvokeAsync<string>(MethodNames.GET_UPN_METHOD);
        public ValueTask<string> GetClientToken() =>
          _JSRuntime.InvokeAsync<string>(MethodNames.GET_CLIENT_TOKEN_METHOD);

        private class MethodNames
        {
            public const string GET_UPN_METHOD =
                "BlazorExtensions.SpectoLogicMSTeams.GetUPN";
            public const string GET_CLIENT_TOKEN_METHOD =
                "BlazorExtensions.SpectoLogicMSTeams.GetClientToken";
        }
    }
}
Add an extension class to allow easy injection into the DI by implementing MSTeamsExtensions.cs:
using Microsoft.Extensions.DependencyInjection;

namespace SpectoLogic.Blazor.MSTeams
{
    public static class MSTeamsExtensions
    {
        public static IServiceCollection AddMSTeams
          (this IServiceCollection services)
            => services.AddScoped<ITeamsClient, TeamsClient>();
    }
}
Add our new component to BlazorTeamApp.Client/Program.cs by using our extension method:
public class Program
{
  public static async Task Main(string[] args)
  {
    ...
    builder.Services.AddScoped(sp => new HttpClient
      { BaseAddress = new Uri(builder.HostEnvironment.BaseAddress) });
    builder.Services.AddMSTeams();
    ...
  }
}
and rewrite the Tab.razor page
@page "/tab"
@inject SpectoLogic.Blazor.MSTeams.ITeamsClient TeamsClient;
<h1>Counter</h1>
<p>Current count: @currentCount</p>
<p>Current User: @userName</p>
<p>AuthToken: @authToken</p>
<button class ="btn btn-primary"  @onclick="IncrementCount">Click me</button>
<button class ="btn btn-primary"  @onclick="GetUserName">Get UserName</button>
<br />
<button class="btn btn-light" @onclick="GetAuthToken">Get Auth-Token</button>
@code {
    private int currentCount = 0;
    private string userName = string.Empty;
    private void IncrementCount()
    {
        currentCount++;
    }
    private async Task GetUserName()
    {
        userName = await TeamsClient.GetUPN();
    }
    private string authToken = string.Empty;
    private async Task GetAuthToken()
    {
        authToken = await TeamsClient.GetClientToken();
    }
}
In our next post we will extend this library to finally access MS-Graph!
That’s it for today! See you tomorrow!
AndiP
Welcome to the fifth post (0-4) of a series that will show you how you can write a Microsoft Teams Application with Blazor Webassembly.
You will find the complete source code in this github repository. I placed my changes in different branches so you can easily jump in at any time.
To create some access tokens we first need to create an Azure Active Directory Application Registration for our Blazor-Tab Application.
Therefore navigate to https://portal.azure.com and select your tenant. Then switch to Azure Active Directory and select App registrations from the left panel. You can navigate there directly by using this link.
Click +New registration to register a new AAD application
and click Register.
Make sure to copy your Application (Client) ID and store it for later. I am using the following Client-ID throughout the samples which need to be replaced with yours: a97275e3-965d-4076-90dd-76cce240e8fb
IMPORTANT
Microsoft Teams will only allow AAD Application Scopes/Redirect URLs that are in the premitted domain. Make sure that you use your NGROK or registered domain here!
Select Expose an API under the Manage section and set an application ID Uri. You can reuse the given UID from the proposed App ID Uri. For example:
Now select +Add a scope to add the required "access_as_user" scope:
Finally click Add scope to add the scope. You will get an url that looks like this:
To directly allow Teams to access we add the well known client IDs of the Microsoft Teams-Applications. There are two of them: Microsoft Teams Web Client and Microsoft Teams Desktop Client
Use the +Add a client application button to add the following client ids. You need to also select the scope "access_as_user" so that the Teams-Apps can access this specific scope!
Since we also want to create further access tokens for Microsoft Graph and our own API with this AAD-Application we create a client secret that we will use to create those tokens. Make sure that the client secret is never stored in a client application! It should always be in a trusted environment.
Click on Certificates & Secrets under the Manage section and create a new client secret by selecting +New client secret
Also copy that client secret. I am using this one (it is invalid now, of course):
Click on API permissions under the Manage section to add permissions to access the graph. We do want to add delegated permissions (permissions in the context of the user). Add the following permissions, if not already defined:
In case you are interessted in knowing more about the offline_access permission, you can read this article.
Afer clicking save make sure to click Grant admin consent for … button to grant these permissions within this tenant. So all users of this tenant do not have to explicitly consent to your MS-Teams App.
Finally select Authentication under the Manage section to add a redirect url for access tokens. We will add the server part later!
After we have registered our AAD Application we want to configure our MS-Teams App to use it.
Open your Visual Studio project and click CTRL+Q to get to the general search. Type "teams" to get the option to view the Microsoft Teams Tool Kit.
As before click edit app-package and select development (some uid). Under Domains and permissions set:
Click Update to update the application package.
This will add this section to the manifest:
...
  ],
  "validDomains": [],
  "webApplicationInfo": {
	    "id": "a97275e3-965d-4076-90dd-76cce240e8fb",
	    "resource": "api://demo.ngrok.io/a97275e3-965d-4076-90dd-76cce240e8fb"
  }
}
Make sure to use your own AppID/URIs and remove your app from teams and redeploy the app with the new development.zip file!
Now let’s write some code to get the Auth-Token that we can later use to get access tokens for MS-Graph and our own API.
First add this javascript code to the index.html page. Again we use the MS-Teams SDK to get the auth token.
function getClientSideToken() {
  try {
          return new Promise((resolve, reject) => {
          console.log("Get auth token from Microsoft Teams");
          microsoftTeams.authentication.getAuthToken({
              successCallback: (result) => {
                  resolve(result);
              },
              failureCallback: function (error) {
                  alert(error);
                  reject("Error getting token: " + error);
              }
          });
      });
  }
  catch (err) {
      alert(err.message);
  }
}
From Blazor we can call this function as we did before by adding a new button and a call to the Javascript Runtime:
...
<p>Current User: @userName</p>
<p>AuthToken: @authToken</p>
...
<button class ="btn btn-primary"  @onclick="IncrementCount">Click me</button>
...
<button class ="btn btn-primary"  @onclick="GetUserName">Get UserName</button>
<br />
<button class="btn btn-light" @onclick="GetAuthToken">Get Auth-Token</button>
	@code {
...
private async Task GetUserName()
{
    userName = await JSRuntime.InvokeAsync<string>("GetUPN");
}
private string authToken = string.Empty;

private async Task GetAuthToken()
{
    authToken = await JSRuntime.InvokeAsync<string>("getClientSideToken");
}
...
Rebuild your application and run it in Visual Studio Debugger. Make sure you have updated your Teams app, then start teams and reload your personal tab. Initialize the Teams-SDK and then try to get the auth token.
Copy the authtoken and paste it to a https://jwt.ms or https://jwt.io to examine the auth token.
That’s it for today! See you tomorrow!
AndiP
Welcome to the forth post of a series that will show you how you can write a Microsoft Teams Application with Blazor Webassembly.
You will find the complete source code in this github repository. I placed my changes in different branches so you can easily jump in at any time.
Before we try to abstract the JavaScript away from our Blazor Application we take a climpse to the JavaScript-World and how we interact from there with our Blazor application.
Before you can access the MS-Teams Context you need to initialize the SDK, which can be simple done by calling the initialize method! The Context contains various key/values where one is the user principal name (upn).
I put these two functionalities in two javascript functions and added this to my index.html page.
Add this code to BlazorTeamApp.Client/wwwroot/index.html:
<script>
var _context;

function InitializeTeamsContext() {
    console.log("InitializeTeamsContext called...");
    try {
      // Initialize SDK
      microsoftTeams.initialize();
      // Fetch MS-Teams Context and store it in the _context variable
      microsoftTeams.getContext((context, error) => {
      _context = context;
    });
  }
  catch (err) {
    alert(err.message);
  }
}

function GetUPN() {
  console.log("GetUPNCalled");
  // Get User Principal Name
  let userName = Object.keys(_context).length > 0 ? _context['upn'] : "";
  return userName;
}
</script>
So how do we call these JavaScript functions from Blazor? By using the JSRuntime class. We inject a instance to our Blazor Page using the @inject command. In the future we want to initialize MS-Teams when the page loads. Right now we require the user to click the buttons in the right order:
Edit BlazorTeamApp.Client/Pages/Tab.razor
@page "/tab"
@inject IJSRuntime JSRuntime;

<h1>Counter</h1>

<p>Current count: @currentCount</p>
<p>Current User: @userName</p>

<button class="btn btn-primary" @onclick="IncrementCount">Click me</button>
<button class="btn btn-primary" @onclick="InitTeams">Init Teams</button>
<button class="btn btn-primary" @onclick="GetUserName">Get UserName</button>

@code {
    private int currentCount = 0;
    private string userName = string.Empty;

    private void IncrementCount()
    {
        currentCount++;
    }

    private async Task InitTeams()
    {
        await JSRuntime.InvokeVoidAsync("InitializeTeamsContext");
    }
    private async Task GetUserName()
    {
        userName = await JSRuntime.InvokeAsync<string>("GetUPN");
    }
}
Hit F5 in Visual Studio to start the application again and switch back to MS-Teams. Hit the refresh button to reload you Team-Tab.
Then click the Init Teams button to initialize the Teams SDK and then Get UserName to display the username of the current logged in user in teams.
Voila! Your first information fetched from MS-Teams. In the next blog post I show you how to get hands on the client auth token that we will use later to get access tokens for Graph and our own services.
That’s it for today! See you tomorrow!
AndiP
Welcome to the third post (developers count from 0) of a series that will show you how you can write a Microsoft Teams Application with Blazor Webassembly.
You will find the complete source code in this github repository. I placed my changes in different branches so you can easily jump in at any time.
Today we’ll have a look at the teams application deployment package and manifest. Each MS-Teams project contains two deployment packages. One for development and one for production. You can configure some basic settings with the corresponding development.json and production.json files:

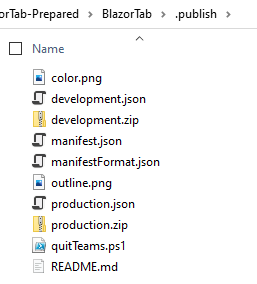
There are more files in that folder as we can see if we open explorer:
The Microsoft Teams Toolkit extension will generate the zip-files which are the deployment packages. If you open a zip file you will see that it contains a manifest.json file.
Instead of editing these files manually we use the integrated Manifest Editor that come with the Teams Toolkit extension. It can be easily found by opening the general search in Visual Studio CTRL+Q and typing teams:

Edit app package by selecting the menu "Edit app package":

Then select development! It is necessary that you are logged in to your tenant (Use Welcome Menue and the Button in the upper right). If you do this the first time, the toolkit will generate a unique ID for your teams application.
Unfortunatly when you move your project somewhere else and other constellations i have not figured out yet it can happen that it cannot find your deployment package and you end up with this weird error message:

What now, you might ask? Well, I solved it by removing the GUID from the development.json file. No worries you won’t loose anything aside of your UID:
{
  "baseUrl0": "https://localhost:44310",
  "version": "1.0.0",
  "appname": "BlazorTab",
  "fullappname": "BlazorTab",
  "teamsAppId": "3bffcaf5-3c25-48a6-9128-7be501f5516e" // <--- Remove this value
}
{
  "baseUrl0": "https://localhost:44310",
  "version": "1.0.0",
  "appname": "BlazorTab",
  "fullappname": "BlazorTab",
  "teamsAppId": ""
}
Then try to edit the manifest again. MS Teams Toolkit will now generate a new UID and you should be good to go again. Sometimes the right editor window does not render correctly. Selecting the left topics "App details" & "Tabs" back and forth will fix this.
App details is quite self explanatory and I won’t walk you through that in detail. Just make sure that the URLs are adapted to your ngrok domain.
For example:
Under Capabilities / Tab we configure our TAB application. If you have a TAB that can be added to a team you need to provide a configuration URL where your end users will customize you Teams App for that Team-Channel. Configure a URL there. For example:
By clicking on the … right to the configuration url you can also define the scope of your Teams Tab application and if the configuration is readonly.
Add a many personal tabs as you like. Configure them accordingly. Each tab should have a name and content url. For example:
Microsoft Teams will replace some variables in the content URL. In the example above it will replace {entityid} with "index". You can find a list of supported context keys here.
You could f.e. create multiple tabs with the same content URL but using different EntityIDs.
Select the file development.zip from your .publish folder, install the application and pin it to your left Teams Taskbar.
Make sure ngrok and your Teams App is running in Visual Studio before you click on you application icon. If you have done everything right, you should now see your /tab razor page within Microsoft Teams.
That’s it for today! See you tomorrow!
AndiP
