Welcome to the third post (developers count from 0) of a series that will show you how you can write a Microsoft Teams Application with Blazor Webassembly.
You will find the complete source code in this github repository. I placed my changes in different branches so you can easily jump in at any time.
Configure the Teams Deployment package
Today we’ll have a look at the teams application deployment package and manifest. Each MS-Teams project contains two deployment packages. One for development and one for production. You can configure some basic settings with the corresponding development.json and production.json files:

There are more files in that folder as we can see if we open explorer:
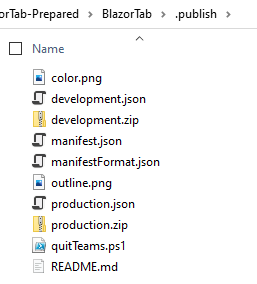
The Microsoft Teams Toolkit extension will generate the zip-files which are the deployment packages. If you open a zip file you will see that it contains a manifest.json file.
Instead of editing these files manually we use the integrated Manifest Editor that come with the Teams Toolkit extension. It can be easily found by opening the general search in Visual Studio CTRL+Q and typing teams:

Edit app package by selecting the menu "Edit app package":

Then select development! It is necessary that you are logged in to your tenant (Use Welcome Menue and the Button in the upper right). If you do this the first time, the toolkit will generate a unique ID for your teams application.
Unfortunatly when you move your project somewhere else and other constellations i have not figured out yet it can happen that it cannot find your deployment package and you end up with this weird error message:

What now, you might ask? Well, I solved it by removing the GUID from the development.json file. No worries you won’t loose anything aside of your UID:
{
  "baseUrl0": "https://localhost:44310",
  "version": "1.0.0",
  "appname": "BlazorTab",
  "fullappname": "BlazorTab",
  "teamsAppId": "3bffcaf5-3c25-48a6-9128-7be501f5516e" // <--- Remove this value
}
{
  "baseUrl0": "https://localhost:44310",
  "version": "1.0.0",
  "appname": "BlazorTab",
  "fullappname": "BlazorTab",
  "teamsAppId": ""
}
Then try to edit the manifest again. MS Teams Toolkit will now generate a new UID and you should be good to go again. Sometimes the right editor window does not render correctly. Selecting the left topics "App details" & "Tabs" back and forth will fix this.
App details is quite self explanatory and I won’t walk you through that in detail. Just make sure that the URLs are adapted to your ngrok domain.
For example:
Under Capabilities / Tab we configure our TAB application. If you have a TAB that can be added to a team you need to provide a configuration URL where your end users will customize you Teams App for that Team-Channel. Configure a URL there. For example:
By clicking on the … right to the configuration url you can also define the scope of your Teams Tab application and if the configuration is readonly.
Add a many personal tabs as you like. Configure them accordingly. Each tab should have a name and content url. For example:
- Name: Blazor Personal Tab
- EntityID: index
- Content URL: https://demo.ngrok.io/tab?entityid={entityid}
- Optional Website URL
Microsoft Teams will replace some variables in the content URL. In the example above it will replace {entityid} with "index". You can find a list of supported context keys here.
You could f.e. create multiple tabs with the same content URL but using different EntityIDs.
Deploy to teams (Sideload)
- Open the Microsoft Teams Client
- In the application bar select Apps and then Upload a custom app (left at the bottom)
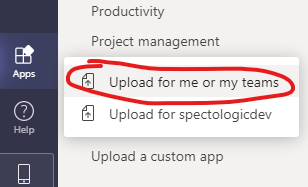
Select the file development.zip from your .publish folder, install the application and pin it to your left Teams Taskbar.
Make sure ngrok and your Teams App is running in Visual Studio before you click on you application icon. If you have done everything right, you should now see your /tab razor page within Microsoft Teams.
That’s it for today! See you tomorrow!
AndiP

Hello! Since the Tab page is rendered through BlazorTeamTab project and the Config, Privacy and TermOfUse pages are rendered through BlazorTab project, each of them should be running? And each of them should have their own ngrok handling?
Thanks!
LikeLike
Hi Martin,
The pages can be accessed locally through https://localhost:5000/yourPageURL.
Since you map the port with ngrok which you can see in blog post Part 1:
ngrok http -region=eu -hostname=“yourName.eu.ngrok.io“ 5000
Every page can be reached through
https://yourName.eu.ngrok.io/yourPageURL
Thnx
Andreas
LikeLike