This is my personal favorite list of shortcuts in Visual Studio 2022 (German Keyboard)!
Enjoy Nina (So short, it could have been on Twitter *haha*)
This is my personal favorite list of shortcuts in Visual Studio 2022 (German Keyboard)!
Enjoy Nina (So short, it could have been on Twitter *haha*)
Here is my list of my most favorite Visual Studio Extensions! For my reference and as a guide to those seeking for such list!
Also if you like to learn some tips on tricks with Visual Studio I recommend joining my session on Visual Studio at ADC21 (German language).
Productivity Extensions
Build / Output Extensions
Visual Studio Themes
Enjoy!
yours Nina
About Hubspot
Let’s start from the beginning. What is HubSpot? HubSpot is a Marketing-, Sales-, Service, CMS and Operations-Software. Learn more about HubSpot here.
What I like in particular with HubSpot is the integration possibilities it offers. It has a rich API and also the capability to call webHooks among other things.
However there are two ways to authenticate against the HubSpot API
Hubspot itself disencourages you from using the API-Key other than for testing/developing purposes and given that an API-Key has no permissions attached to it and gives you control to almost everything in HubSpot you should never hand out the API-Key of a production system!
To develop applications you can register for a free developer account and sandbox for testing.
Concept and registration process of HubSpot Applications
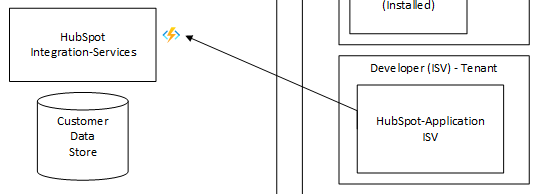
HubSpot allows ISV’s (independent software vendors) to write integrations and offer those as „Hubspot-Integration-Apps“ to all customers of HubSpot. Therefore your integration always must be multi-tenant per se. Although there are some „workarounds“ to only allow access to certain HubSpot-Tenants as we see later.
As an ISV you register an „HubSpot-Application“ inside your Developer Account with HubSpot. Here you will gain access to a so called „Installation-Url“ that you can offer your customers to install you Applications in their HubSpot-Tenants. If you also publish your HubSpot-Application to the HubSpot-Store all customers will see this integration and can choose to install your application.
As you can see in the illustration below „your“ ISV Application from your Developer-Tenant is installed in the tenants of Customers A and B. Customer C has not installed „your“ ISV Application.

So how does the „Install-Process“ actually work conceptually? While registering your HubSpot-Application (this process is quite straight forward) you need to provide an End-Point that HubSpot can call once a customer decides to install the application to their tenant.
You also declare what permissions you require at a minimum so your integration works properly (For example: Access to Contacts)
If the user clicks on the installation url (which by the way can contain additional optional permissions) they have to confirm that they want to give access to the application.
Then the endpoint (ISV) simply will receive an „CODE“ that must be redeemed to get an Access Token from HubSpot. The base code template for an Azure Function App would look like this:
[FunctionName("RegisterHubSpotApp")]
public async Task<IActionResult> RegisterHubSpotApp(
    [HttpTrigger(AuthorizationLevel.Anonymous, "get", Route = null)]
    HttpRequest req,
    ILogger log)
{
    try
    {
        var code = req.Query["code"].FirstOrDefault();
        if (!string.IsNullOrWhiteSpace(code))
        {
            // Redeem Code here!
        }
    }
    catch (Exception ex)
    {
        log.LogError(ex, ex.Message);
        return new BadRequestObjectResult(ex.Message);
    }
    return new BadRequestResult();
}
Unfortunately we still do not know which Customer Tenant did choose to install our application! The next step would be to acquire the Access-Token and Refresh-Token! Which still does not provide us with the information about the tenant!
Access-Token: This is the BEARER-Token you must use in the „Authorization„-Header when you make calls to the HubSpot-API. This will only be valid for a certain amount of time (see „ExpiresIn„-Field)
Refresh-Token: This is the token you must keep secure at all costs! Best to store it somewhere secure like Azure KeyVault. Having this token you can request new Access-Tokens that have expired! [SECURITY WARNING]
Said that to acquire the Access/Refresh-Token you need to provide following information that you can obtain from your registered HubSpot-Application:
A simple implementation in an Azure Function might look like this:
public class OAuthTokenResponse
    {
        [JsonProperty(PropertyName = "token_type")]
        public string TokenType { get; set; }
        [JsonProperty(PropertyName = "refresh_token")]
        public string RefreshToken { get; set; }
        [JsonProperty(PropertyName = "access_token")]
        public string AccessToken { get; set; }
        [JsonProperty(PropertyName = "expires_in")]
        public int ExpiresIn { get; set; }
    }

private const string HUBSPOT_TOKEN_API = "https://api.hubapi.com/oauth/v1/token";

private async Task<OAuthTokenResponse> GetOAuthToken(string code)
{
    HttpClient client = _httpFactory.CreateClient();

    List<KeyValuePair<string, string>> data = new List<KeyValuePair<string, string>>()
        {
            new KeyValuePair<string, string>("grant_type","authorization_code"),
            new KeyValuePair<string, string>("client_id",_config["clientID"]),
            new KeyValuePair<string, string>("client_secret",_config["clientSecret"]),
            new KeyValuePair<string, string>("redirect_uri", _config["RedirectUri"]),
            new KeyValuePair<string, string>("code", code)
        };
    HttpRequestMessage httpRequest = new HttpRequestMessage
    {
        RequestUri = new Uri(HUBSPOT_TOKEN_API),
        Content = new FormUrlEncodedContent(data),
        Method = HttpMethod.Post
    };
    HttpResponseMessage httpResponse = await client.SendAsync(httpRequest);
    if (httpResponse.IsSuccessStatusCode)
    {
        var token = JsonConvert.DeserializeObject<OAuthTokenResponse>(await httpResponse.Content.ReadAsStringAsync());
        if (token != null && !string.IsNullOrWhiteSpace(token.RefreshToken))
        {
            return token;
        }
    }
    else
    {
        var response = await httpResponse.Content.ReadAsStringAsync();
    }
    return null;
}
So there is a lot of effort to be done and still we have no idea which Tenant has requested the install! Fortunately we can use the RefreshToken (keep in mind to keep it secure!) to retrieve some information about it.
The result of this API Call will look like this:
{
  "token": "xxxxxxxx-xxxx-xxxx-xxxx-xxxxxxxxxxxx",
  "user": "test@hubspot.com",
  "hub_domain": "demo.hubapi.com",
  "scopes": [
    "automation",
    "contacts",
    "oauth"
  ],
  "hub_id": 62515,
  "client_id": "yyyyyyyy-yyyy-yyyy-yyyy-yyyyyyyyyyyy",
  "user_id": 123,
  "token_type": "refresh"
}
and gives us information about
You might have noticed using Hubspot that the „hub_id“ is always a part of the URL. Example of an url to a contact:
An implementation in Azure Functions might look like this:
private async Task<OAuthRefreshTokenInfo> GetRefreshTokenInfo(string refreshToken)
{
    HttpClient client = _httpFactory.CreateClient();

    HttpResponseMessage tokenInfoResponse = await client.GetAsync(string.Format("https://api.hubapi.com/oauth/v1/refresh-tokens/{0}", refreshToken));
    if (tokenInfoResponse.IsSuccessStatusCode)
    {
        OAuthRefreshTokenInfo tokenInfo = JsonConvert.DeserializeObject<OAuthRefreshTokenInfo>(await tokenInfoResponse.Content.ReadAsStringAsync());
        if (tokenInfo.ClientId == _config["clientID"])
        {
            return tokenInfo;
        }
    }
    return null;
}
After we do have AccessToken, RefreshToken and Tenant-Information we need to store the Refresh-Token together with the Tenant-Information so our integration application can use this information to create an AccessToken on demand.
Make sure you cache the AccessToken securely to prevent unnecessary round-trips in your integration. And make sure the RefreshToken is stored securely (f.e. Azure KeyVault)!
Thanks and enjoy
Nina
The public preview of role-based access control (RBAC) for the Azure Cosmos DB Core (SQL) API was announced yesterday at Microsoft Ignite. This does not only allow us to authenticate our requests with an Azure Active Directory identity based on roles, but also allows to audit the identities which accessed your data.
In this blog post I walk you through a complete example on how you can use Azure Cosmos DB with RBAC and managed identity. We will
Open https://portal.azure.com and create a new resource group „cosmosrbac„.
Create a new Azure Cosmos DB Account in that resource group. For this sample I had been using the new serverless option. Use the DataExplorer (under Settings) to create a new Database „demodb“ and a Collection „democol„. I am using „/p“ as a generic partition key. This is especially useful, if you store different kind of documents in your collection which are partitioned differently. Also create a document with the „New document“ button since our permissions will be read only later.
{
"id":"001",
"p":"Test",
"First":"Andreas"
}
Now create a new Log Analytics Workspace and a Azure Function App (serverless) in the resource group „cosmosrbac„. I named those „cosmosrbaclog“ and „cosmosrbacfunc„
Now lets configure the Azure Cosmos DB account so that all Dataplane Requests are audited in our Log Analytics Workspace. To do that select your Azure Cosmos DB resource, click on „Diagnostic settings“ in the section „Monitoring„. Add a new diagnostic setting where you just select „DataPlaneRequests“ and your created Log Analytics Workspace. I named that setting „SecurityLog“.

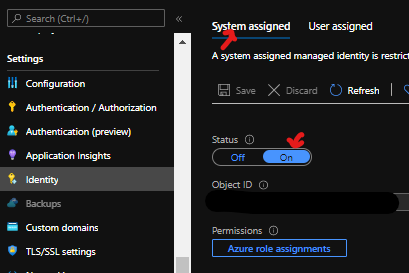
In the portal select your Azure App Function and click on „Identity“ in the section „Settings„. Select „System assigned“ and turn the Status to „On„. Write down the given Object ID which represents the Object ID of the Service Principal in Azure AD. Read more about the managed identity types in the documentation here.
To create a new CosmosDB RBAC role we need to define which permissions the role consists of. This can be done by defining a JSON file. We will be creating a new role „MyReadOnlyRole“ with following permissions:
You can find all available Cosmos DB permissions here.
In the Azure Portal open the cloud shell. You can find the cloud shell in the upper bar on the right side. I am using PowerShell version! If you use bash instead you might need to slightly adopt the statements below. To create and assign the role you need the latest Azure Cosmos DB az extension which you can install with this command:
az extension add --name cosmosdb-preview
Then start the nano editor and create a new file „roledefinition.json„
nano roledefinition.json
Copy and paste the following json document and save the document by pressing CTRL+Q and selecting Y:
{
    "RoleName": "MyReadOnlyRole",
    "Type": "CustomRole",
    "AssignableScopes": ["/"],
    "Permissions": [{
        "DataActions": [
            "Microsoft.DocumentDB/databaseAccounts/readMetadata",
            "Microsoft.DocumentDB/databaseAccounts/sqlDatabases/containers/items/read",
            "Microsoft.DocumentDB/databaseAccounts/sqlDatabases/containers/executeQuery",
            "Microsoft.DocumentDB/databaseAccounts/sqlDatabases/containers/readChangeFeed"
        ]
    }]
}
Now create the defined role with the following statements. Make sure you replace the values of $resourceGroupName and $accountName with those you selected:
$resourceGroupName='cosmosrbac'
$accountName='cosmosrbac'
az cosmosdb sql role definition create --account-name $accountName --resource-group $resourceGroupName --body roledefinition.json
To later get a list of your defined roles you can issue this statement:
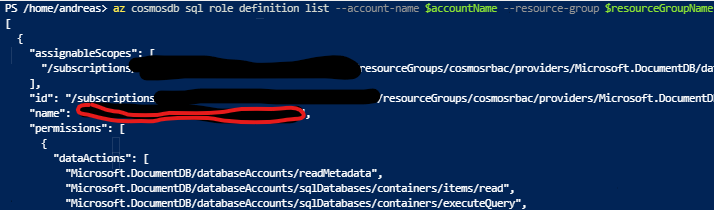
az cosmosdb sql role definition list --account-name $accountName --resource-group $resourceGroupName
Write down the value of „name“ of the new created role definition as we will need it in our next step.
Now we assign this new role to our previously created system managed identity. Replace the $readOnlyRoleDefinitionId value with the value of the role-name (see above) and replace the $principalId value with the Object ID we got earlier when we configured our Azure Function App:
$resourceGroupName='cosmosrbac'
$accountName='cosmosrbac'
$readOnlyRoleDefinitionId = 'name of role definition'
$principalId = 'object id of system managed identity'

az cosmosdb sql role assignment create --account-name $accountName --resource-group $resourceGroupName --scope "/" -p $principalId --role-definition-id $readOnlyRoleDefinitionId
We now can use this system managed identity from Azure Function App to access Cosmos DB with the permissions we defined for that role. To see all the assignments you made you execute this statement:
az cosmosdb sql role assignment list --account-name $accountName --resource-group $resourceGroupName
Now start Visual Studio 2019 and create a new function app with a HTTP Trigger. Right click the new created project and select „Manage nuget packages…“. Make sure the checkbox „Include prerelease“ is checked! Add the following nuget packages to your solution:

Modify Function1.cs file as following. First replace the using statements with these:
using Azure.Identity;
using Microsoft.AspNetCore.Http;
using Microsoft.AspNetCore.Mvc;
using Microsoft.Azure.Cosmos;
using Microsoft.Azure.WebJobs;
using Microsoft.Azure.WebJobs.Extensions.Http;
using Microsoft.Extensions.Logging;
using Newtonsoft.Json;
using System;
using System.Threading.Tasks;
Add a person class which represents our documents in Azure Cosmos DB
public class Person
{
    public string Id { get; set; }
    public string p { get; set; }
    public string First { get; set; }
}
Inside the class „public static class Function1“ write following two function. One to read an item and another to write an item. Make sure that you replace <yourAccount> with the name of your Azure Cosmos DB account name:
[FunctionName("GetItem")]
public static async Task<IActionResult> GetItem(
  [HttpTrigger(AuthorizationLevel.Function, "get", "post", Route = null)] HttpRequest req,
   ILogger log)
{
  try
    {
      // Since we know that we have a managed identity we instatiate that directly
      // var tokenCredential = new DefaultAzureCredential();
      ManagedIdentityCredential tokenCredential = new ManagedIdentityCredential();
      CosmosClient client = new
       CosmosClient("https://<yourAccount>.documents.azure.com:443/", tokenCredential);
      Container container = client.GetContainer("demodb", "democol");
      ItemResponse<Person> res = await container.ReadItemAsync<Person>("001", new PartitionKey("Test"));
      return new OkObjectResult(JsonConvert.SerializeObject(res.Resource));
    }
    catch (Exception ex)
    {
      return new BadRequestObjectResult(ex.ToString());
    }
}
[FunctionName("CreateItem")]
public static async Task<IActionResult> CreateItem(
    [HttpTrigger(AuthorizationLevel.Function, "get", "post", Route = null)] HttpRequest req,
    ILogger log)
{
  try
  {
    ManagedIdentityCredential tokenCredential = new ManagedIdentityCredential();
    CosmosClient client =
      new CosmosClient("https://<yourAccount>.documents.azure.com:443/", tokenCredential);
    Container container = client.GetContainer("demodb", "democol");
    ItemResponse<Person> res = await container.CreateItemAsync<Person>(
	new Person()
	{ Id = "002",
	  p = "Test",
          First = "Sonja" },
	new PartitionKey("Test"));
    return new OkObjectResult(JsonConvert.SerializeObject(res.Resource));
  }
  catch (Exception ex)
  {
    return new BadRequestObjectResult(ex.ToString());
  }
}
Compile the application and publish it to the Azure function app (Right click project – Publish). Open the Azure portal again and navigate to your Azure function app. Under the section „Function“ select „Functions„. Select each function and aquirce a function URL with the „Get function Url“ buttom in the upper bar.

Now use a tool like Postman to try to execute your functions. While the GetItem-Function will return a result

the CreateItem-Function will return an RBAC access error.

Navigate now to your Azure Log Analytics Workspace in the Azure Portal. Under the section „General“ select „Logs„. Issuing the following statement will show the failed access to the document:
AzureDiagnostics
| where ResourceProvider == "MICROSOFT.DOCUMENTDB"
  and Category == "DataPlaneRequests"
  and ResourceGroup == "COSMOSRBAC"
  and requestResourceType_s == "Document"
| where OperationName == 'Create'
| summarize by statusCode_s, OperationName, aadPrincipalId_g, aadAppliedRoleAssignmentId_g

Replacing the Operation Name with „Read“ on the other hand will show all 200 success code for that given principal id.
AzureDiagnostics
| where ResourceProvider == "MICROSOFT.DOCUMENTDB"
  and Category == "DataPlaneRequests"
  and ResourceGroup == "COSMOSRBAC"
  and requestResourceType_s == "Document"
| where OperationName == 'Read'
| summarize by statusCode_s, OperationName, aadPrincipalId_g, aadAppliedRoleAssignmentId_g
I hope you enjoyed our tour!
Kind regards
AndiP
Welcome to the third post (developers count from 0) of a series that will show you how you can write a Microsoft Teams Application with Blazor Webassembly.
You will find the complete source code in this github repository. I placed my changes in different branches so you can easily jump in at any time.
Today we’ll have a look at the teams application deployment package and manifest. Each MS-Teams project contains two deployment packages. One for development and one for production. You can configure some basic settings with the corresponding development.json and production.json files:

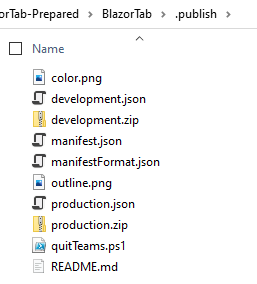
There are more files in that folder as we can see if we open explorer:
The Microsoft Teams Toolkit extension will generate the zip-files which are the deployment packages. If you open a zip file you will see that it contains a manifest.json file.
Instead of editing these files manually we use the integrated Manifest Editor that come with the Teams Toolkit extension. It can be easily found by opening the general search in Visual Studio CTRL+Q and typing teams:

Edit app package by selecting the menu "Edit app package":

Then select development! It is necessary that you are logged in to your tenant (Use Welcome Menue and the Button in the upper right). If you do this the first time, the toolkit will generate a unique ID for your teams application.
Unfortunatly when you move your project somewhere else and other constellations i have not figured out yet it can happen that it cannot find your deployment package and you end up with this weird error message:

What now, you might ask? Well, I solved it by removing the GUID from the development.json file. No worries you won’t loose anything aside of your UID:
{
  "baseUrl0": "https://localhost:44310",
  "version": "1.0.0",
  "appname": "BlazorTab",
  "fullappname": "BlazorTab",
  "teamsAppId": "3bffcaf5-3c25-48a6-9128-7be501f5516e" // <--- Remove this value
}
{
  "baseUrl0": "https://localhost:44310",
  "version": "1.0.0",
  "appname": "BlazorTab",
  "fullappname": "BlazorTab",
  "teamsAppId": ""
}
Then try to edit the manifest again. MS Teams Toolkit will now generate a new UID and you should be good to go again. Sometimes the right editor window does not render correctly. Selecting the left topics "App details" & "Tabs" back and forth will fix this.
App details is quite self explanatory and I won’t walk you through that in detail. Just make sure that the URLs are adapted to your ngrok domain.
For example:
Under Capabilities / Tab we configure our TAB application. If you have a TAB that can be added to a team you need to provide a configuration URL where your end users will customize you Teams App for that Team-Channel. Configure a URL there. For example:
By clicking on the … right to the configuration url you can also define the scope of your Teams Tab application and if the configuration is readonly.
Add a many personal tabs as you like. Configure them accordingly. Each tab should have a name and content url. For example:
Microsoft Teams will replace some variables in the content URL. In the example above it will replace {entityid} with "index". You can find a list of supported context keys here.
You could f.e. create multiple tabs with the same content URL but using different EntityIDs.
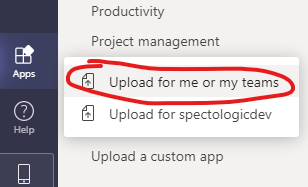
Select the file development.zip from your .publish folder, install the application and pin it to your left Teams Taskbar.
Make sure ngrok and your Teams App is running in Visual Studio before you click on you application icon. If you have done everything right, you should now see your /tab razor page within Microsoft Teams.
That’s it for today! See you tomorrow!
AndiP
Welcome to the second post of a series that will show you how you can write a Microsoft Teams Application with Blazor Webassembly.
You will find the complete source code in this github repository. I placed my changes in different branches so you can easily jump in at any time.
Today we continue with our base MS-Teams project. Since our service must run on a public available domain I recommend using NGROK (yesterday I learned it is spoken like this: [n g rock] ) which is a tunneling service that offers a public URL that will tunnel a request to your local machine.
An additional benefit is that NGROK also provides a SSL-Endpoint terminating at the tunneling site, so you can easily server HTTPS without worring about certificates.
Warning: If you use the free edition of NGROK your domain name will change every hour or so. Since we will also configure Azure Active Directory Applications in AAD this can be tedious to constantly adapt. I would recommend to buy the base version or to host the application on your domain.
Let’s start! Add a new "Blazor"-Project in Visual Studio to our existing solution:
a. Project-Name: BlazorTeamApp
b. Select "Blazor WebAssembly App"
c. Configure for HTTPS: YES
d. ASP.NET Core hosted: YES
Next we reuse the Counter.razor page as our first tab page. To name it properly we rename Counter.razor to Tab.razor. Make sure that all your razor pages follow the Pascal naming convention otherwise Visual Studio will complain!
In the file BlazorTeamApp.Client/Pages/Tab.razor replace
Since Teams has it’s own navigation we remove the sidebar by removing following code in the file BlazorTeamApp.Client/Shared/MainLayout.razor:
<div class="sidebar">
    <NavMenu />
</div>
Right click the project "BlazorTeamApp.Client" and select "Manage Client Side Libraries". Then replace the content of the file libman.json with the following code.
{
  "version": "1.0",
  "defaultProvider": "cdnjs",
  "libraries": [
    {
      "provider": "jsdelivr",
      "library": "@microsoft/teams-js@1.8.0",
      "destination": "wwwroot/scripts/teams"
    }
  ]
}
The folder BlazorTeamApp.Client/wwwroot/scripts/teams should have been created!
Lets add the MicrosoftTeams.js file to the index.html page to have it run at startup!
Edit BlazorTeamApp.Client/wwwroot/index.html
...

    <!--Reference to the MS Teams Script added with libman -->


...
IIS Express does not allow your site beeing called from outside. So NGROK can not tunnel to a IIS Express hosted site running on an address like "https://localhost:44383/tab".
Open the project settings of BlazorTeamApp.Server and select the settings for Debug:
Since we use the NGROK Https Endpoint we remove the HttpsRedirection in Startup.cs:
Comment out the HttpsRedirection in "BlazorTeamAp.Server/Startup.cs":
...
// app.UseHttpsRedirection();
app.UseBlazorFrameworkFiles();
...
Once you have setup NGROK with your account open a terminal window and tunnel port 5000 to your NGROK sub domain. Adapt the region depending on your setup:
ngrok http -region=eu -hostname=".eu.ngrok.io" 5000
Start the "BlazorTeamApp.Server" (not IIS Express!) in the debugger and validate that you can browse the following urls (replace demo.eu.ngrok.io with your ngrok domain):
That’s it for today! See you tomorrow!
AndiP


"appRoles": [
{
"allowedMemberTypes": ["Application" ],
"description": "Weather API",
"displayName": "Weather API",
"id" : "4B*************08",
"isEnabled": true,
"lang" : null,
"origin": "Application",
"value": "weather.read"
}
],
...
ports:
- 90:80
...
ports:
- 9090:8080
...
apt-get update
apt-get install zip unzip
Cd ~
php -r "copy('https://getcomposer.org/installer', 'composer-setup.php');"
php -r "if (hash_file('sha384', 'composer-setup.php') === '795f976fe0ebd8b75f26a6dd68f78fd3453ce79f32ecb33e7fd087d39bfeb978342fb73ac986cd4f54edd0dc902601dc') { echo 'Installer verified'; } else { echo 'Installer corrupt'; unlink('composer-setup.php'); } echo PHP_EOL;"
php composer-setup.php
php -r "unlink('composer-setup.php');"
As OAuth2 library I want to use „thenetworg/oauth2-azure“ which can be found here.
It is based on the OAuth2 Library „thephpleague/oauth2-client“ which can be found here.
Then install this package to the sample which resides in /var/www/html:
cd /var/www/html
php ~/composer.phar require thenetworg/oauth2-azure
Exit to the terminal and start VS-Code in the local directory or any other editor of your choice For our sample we need following information which we collected earlier:
$provider = new TheNetworg\OAuth2\Client\Provider\Azure([
'clientId' => 'c9e*****9ea',
'clientSecret' => 'AKX********',
'redirectUri' => 'http://localhost:90',
'tenant' => 'e2*******3d',
'urlAuthorize' => 'https://login.microsoftonline.com/e2*******3d/oauth2/v2.0/authorize',
'urlAccessToken' => 'https://login.microsoftonline.com/e2*******3d/oauth2/v2.0/token',
'urlAPI' => 'b37*******b02',
'scope' => 'b37*******b02/.default'
]);
$provider->defaultEndPointVersion = TheNetworg\OAuth2\Client\Provider\Azure::ENDPOINT_VERSION_2_0;
We can now retrieve the access token with the following code:
$accessToken = $provider->getAccessToken('client_credentials', [
'scope'=> $provider->scope
]);
<?php
echo "OAuth Sample<br/>";
/* Make sure we include necessary libraries */
require_once(__DIR__."/vendor/autoload.php");
/* Initialize provider */
$provider = new TheNetworg\OAuth2\Client\Provider\Azure([
    'clientId' => 'c9e*****9ea',
    'clientSecret' => 'AKX********',
    'redirectUri' => 'http://localhost:90',
    'tenant' => 'e2*******3d',
    'urlAuthorize' => 'https://login.microsoftonline.com/e2*******3d/oauth2/v2.0/authorize',
    'urlAccessToken' => 'https://login.microsoftonline.com/e2*******3d/oauth2/v2.0/token',
    'urlAPI' => 'b37*******b02',
    'scope' => 'b37*******b02/.default'
]);
$provider->defaultEndPointVersion = TheNetworg\OAuth2\Client\Provider\Azure::ENDPOINT_VERSION_2_0;

try {
    $accessToken = $provider->getAccessToken('client_credentials', [
        'scope' => $provider->scope
    ]);
} catch (\League\OAuth2\Client\Provider\Exception\IdentityProviderException $e) {
    // Failed to get the access token
    exit($e->getMessage());
}
echo "Access-Token:";
echo $accessToken;
Now we can call http://localhost:90 on our machine and retrieve the JWT Bearer Token.
Open Postman and make a get request to:
In the Authorization TAB select type: „Bearer Token“ and paste the access token to the token field.
If you hit Send now, you will retrieve the results of the weatherforecast.
That’s it. Thanks
Andreas
Update 19.11.2018: Checkout my experimental implementation of a Metrics-Client Library for CosmosDB on github.
With Azure Monitor you have a single way to access metrics for a lot of supported azure resources. My personal guess on how the implemented Azure Monitor is that each Azure Resource provider (like Microsoft.DocumentDB) built an addon-provider „microsoft.insights“ that is used by Azure Monitor.
Azure Monitor only supports these metrics for CosmosDB. The Azure Monitor REST API documentation to query metrics describes the input and output values.
Of these I found these most relevant for the DocumentDB-API:
– Consumed request units: TotalRequestUnits (Unit:Count, Aggregation: count/total)
– Number of requests made: TotalRequests (Unit:Count, Aggregation: count/total)
which can be filtered by
– DatabaseName
– CollectionName
– Region
– StatusCode
Update: During development of the sample I noticed that the documentation is quite outdated. The new Version „2018-01-01“ supports additional metrics that are not documented on the page above. Here the DocumentDB relevant ones:
– AvailableStorage
– DataUsage
– DocumentCount
– DocumentQuota
– IndexUsage
– ReplicationLatency
– ServiceAvailability
(Un)Fortunately CosmosDB provides other interesting metrics as well that cannot be retrieved by Azure Montior. You might have noticed additional metric data in the metrics blade of CosmosDB like:
These and more metrics can be retrieved directly from the CosmosDB Azure Resource Provider. This was/is the „old way“ to retrieve metrics before the arrival of Azure Monitor, if i got that right. The reference chapter describes all the various metrics you can consume from CosmosDB Resource Provider.
While Azure Monitor provides a nice nuget package (enable preview!) that you can use to access Azure Monitor metrics, you need to work with the REST-API to access the other metrics.
In this article I will focus on the DocumentDB metrics retrieved by REST (also the Azure Monitor ones). You can find a Azure Monitor Sample with .NET Core here.
The {resourceUri} is actually a path to the requested Azure resource. Azure Monitor basically always uses the path to the CosmosDB account. If you work directly with the Azure Resource Provider of CosmosDB you need the other paths to:
Resource Uri -> Database Account
This path is basically used whenever we work with Azure Monitor REST-API
– subscriptions/{subscriptionId}/resourceGroups/{rgName}/providers/Microsoft.DocumentDb/databaseAccounts/{cosmosDBAccountName}
Resource Uri -> DocumentDB Database
– subscriptions/{subscriptionId}/resourceGroups/{rgName}/providers/Microsoft.DocumentDb/databaseAccounts/{cosmosDBAccountName}/databases/{databaseResourceId}
Resource Uri -> DocumentDB Collection
(Mostly used in Azure resource Metric queries)
– subscriptions/{subscriptionId}/resourceGroups/{rgName}/providers/Microsoft.DocumentDb/databaseAccounts/{cosmosDBAccountName}/databases/{databaseResourceId}/collections/{collectionResourceId}
Resource Uri -> DocumentDB Collection Partition in a specific region
– subscriptions/{subscriptionId}/resourceGroups/{rgName}/providers/Microsoft.DocumentDb/databaseAccounts/{cosmosDBAccountName}/region/{regionName}/databases/{databaseResourceId}/collections/{collectionResourceId}/partitions
You can find out which regions your CosmosDB is available by querying the ARM REST API of the CosmosDB Account Azure Resource. Use the „Resources Get REST API“. For CosmosDB you find the documentation on how to retrieve the details of the CosmosDB Account Resource here.
The documentations misses out additional values in „properties“. While „enableAutomaticFailover“ and „enableMultipleWriteLocations“ (multimaster) is quite easy to guess I have no idea what „capabilities“ and „configurationOverrides“ will contain (maybe other API’s?):
– capabilites: []
– configurationOverrides: {}
– enableAutomaticFailover: false
– enableMultipleWriteLocations: false
Here a non exhaustive list of potential regions:
splitted in multiple rows for better reading
This request will fetch the „Available Storage“, „Data Size“, „Index Size“ in the time frame:
2018-10-10T06:55:00.000Z to 2018-10-10T07:55:00.000Z with a 5 minute interval (PT5M). Since the resource uri path points to a specific collection, only the data of this collection is retrieved!
    https://management.azure.com/
    subscriptions/12a34456-bc78-9d0e-fa1b-c2d3e4567890/resourceGroups/demoRG/
    providers/Microsoft.DocumentDb/databaseAccounts/demodocs/
    databases/6XAQAA==/collections/6XAQAITyPQA=/metrics?
    api-version=2014-04-01
    &$filter=
        (
        name.value eq 'Available Storage' or
        name.value eq 'Data Size' or
        name.value eq 'Index Size'
        ) and
        startTime eq 2018-10-10T06%3A55%3A00.000Z and
        endTime eq 2018-10-10T07%3A55%3A00.000Z and
        timeGrain eq duration'PT5M'
splitted in multiple rows for better reading
This request will fetch the „TotalRequests“-metric within the timespan from: 10.Oct. 2018 07:57 to 10.Oct. 2018 08:57 (one hour). The result will be delivered in 1 Minute invervals (PT1M). In this case we want all Databases, Collections, Regions and StatusCodes.
    https://management.azure.com/
    subscriptions/12a34456-bc78-9d0e-fa1b-c2d3e4567890/resourceGroups/demoRG/
    providers/Microsoft.DocumentDb/databaseAccounts/demodocs/
    providers/microsoft.insights/metrics?
    timespan=2018-10-10T07:57:00.000Z/2018-10-10T08:57:00.000Z
    &interval=PT1M
    &metric=TotalRequests
    &aggregation=total
    &$filter=DatabaseName eq '*' and CollectionName eq '*' and Region eq '*' and StatusCode eq '*'
    &api-version=2017-05-01-preview
The azure portal on the CosmosDB metrics blade currently uses this API-Version: 2017-05-01-preview. There is a more recent one „2018-01-01“. To get the supported API-Versions send in a wrong one :-).
Note that the new version requires „metricNames“ instead of „metric“!
    https://management.azure.com/
    subscriptions/12a34456-bc78-9d0e-fa1b-c2d3e4567890/resourceGroups/demoRG/
    providers/Microsoft.DocumentDb/databaseAccounts/demodocs/
    providers/microsoft.insights/metrics?
    timespan=2018-10-10T07:57:00.000Z/2018-10-10T08:57:00.000Z
    &interval=PT1M
    &metricNames=TotalRequests
    &aggregation=total
    &$filter=DatabaseName eq '*' and CollectionName eq '*' and Region eq '*' and StatusCode eq '*'
    &api-version=2018-01-01
Other intervals:
– PT1M (1 minute)
– PT5M (5 minutes)
– PT1H (1 hour)
– PT1D (1 day)
– P7D (7 days)
    DatabaseName eq 'databaseName' and
    CollectionName eq '*' and
    Region eq '*' and
    ddStatusCode eq '*'
    DatabaseName eq 'databaseName' and
    CollectionName eq 'colName' and
    StatusCode eq '*'
    (
    name.value eq 'Available Storage' or
    name.value eq 'Data Size' or
    name.value eq 'Index Size'
    ) and
    endTime eq 2018-10-10T07%3A55%3A00.000Z and
    startTime eq 2018-10-10T06%3A55%3A00.000Z and
    timeGrain eq duration'PT5M'
Documentation for fetching metrics from the Collection:
    (
        name.value eq 'Max RUs Per Second'
    ) and
    endTime eq 2018-10-10T07%3A58%3A00.000Z and
    startTime eq 2018-10-10T06%3A58%3A00.000Z and
    timeGrain eq duration'PT1M'
Depending on the given resourceUri path the result will vary. The portal uses these three combinations of ResourceUri(s):
You can find the respective documentation here:
For the „DocumentDB Collection Partition in a specific region“ I missed out the documented „partitionId“-value in my results. I got only „partitionKeyRangeId“. I also got a „region“-value for each entry in my value array. The portal uses the MAX value of all retrieved metric values to display the MAX-RUs for a partition.
see next section, uses the results from the same query
This request had been used in the „Overview-Tab“ as well. The result is basically grouped by Database, Collection and Statuscode. So we can filter the 429 requests to get result we need.
    DatabaseName eq '*' and
    CollectionName eq '*' and
    StatusCode eq '*'
The generic result structure is documented here.
Within the the value the Metric ID will be „/subscriptions/12a34456-bc78-9d0e-fa1b-c2d3e4567890/resourceGroups/myRG/providers/Microsoft.DocumentDb/databaseAccounts/cosmosDBAccount/providers/Microsoft.Insights/metrics/TotalRequests“.
The timeseries array contains entries that basically represent the groups (by DBName, CollectionName and Status Code). Each group contains (in this case 60 items, one per minute PT1M) all the values for that group. The metadatavalues.name will be one of the following:
Latency for a 1KB document lookup operation observed in North Europe in the 99th percentile
    (
        name.value eq 'Observed Read Latency' or
        name.value eq 'Observed Write Latency'
    ) and
    endTime eq 2018-10-10T15%3A00%3A00.000Z and
    startTime eq 2018-10-10T14%3A00%3A00.000Z and
    timeGrain eq duration'PT5M'
I was really missing out a single page that describes all the metric possibilities with CosmosDB. I hope that this fills the gap.
Enjoy and have a great day!
AndiP
During local development, I often use Azure CosmosDB emulator instead of having a running instance in the cloud. Naturally, my unit tests also use the emulator.
Since our gated check-in requires all unit tests to complete we need to find a way to complete all tests in Azure DevOps.
Luckily there is this handy pipeline task from the Visual Studio Marketplace at hand!
In case you never heard of Azure DevOps (formerly known as VSTS) or Azure pipelines you can get a good overview here. You can sign up for free for Azure DevOps here.
For our purpose I have created a new MVC Asp.NET Core 2.1 web application in Visual Studio including an additional .NET Core MSTest project ‚EmulatorDemoTests‘ which will contain my unit tests.
In the sample code I use the slightly adapted class DocumentDBRepository from the ToDo-App CosmosDB sample. We add the following nuget packages:
– „Microsoft.Azure.DocumentDB.Core“
– „System.Configuration.ConfigurationManager“.
For the test project i created a file „.runsettings“, which is required to configure the access to our local cosmosdb instance.
<RunSettings>
    <TestRunParameters>
    <!-- Path to the local CosmosDB instance -->
    <Parameter name="endpoint" value="https://localhost:8081" />
    <!-- Wellknown Secret to acccess the emulator instance -->
    <Parameter name="authKey" value="C2y6yDjf5/R+ob0N8A7Cgv30VRDJIWEHLM+4QDU5DE2nQ9nDuVTqobD4b8mGGyPMbIZnqyMsEcaGQy67XIw/Jw==" />
    <!-- Database and collection name -->
    <Parameter name="database" value="demodb" />
    <Parameter name="collection" value="democol" />
  </TestRunParameters>
</RunSettings>
In order to have Visual Studio pick up that file, you need to set the Test Settings file with following commands:
– Test – Test Settings – Select Test Settings File (Select your .runsettings file)
In the „CosmosDBTest“ class I ensure that our DocumentDBRepository is initialized properly with the settings from .runsettings file:
[TestInitialize()]
public void CosmosDBInitialize()
{
    this._EndpointUrl = TestContext.Properties["endpoint"].ToString();
    this._AuthKey = TestContext.Properties["authKey"].ToString();
    this._DatabaseName = TestContext.Properties["database"].ToString();
    this._CollectionName = TestContext.Properties["collection"].ToString();
    DocumentDBRepository<Person>.Initialize(
            this._EndpointUrl,
            this._AuthKey,
            this._DatabaseName,
            this._CollectionName);
}
I have written a simple test case which will suffice for our little sample.
[TestMethod]
public async Task TestInsertDocuments()
{
    var document = await DocumentDBRepository<Person>.CreateItemAsync(new Person
    {
        Age = 38,
        FirstName = "Andreas",
        LastName = "Pollak"
    });
    Assert.IsNotNull(document);
    Assert.IsFalse(string.IsNullOrEmpty(document.Id));

    var person = (await DocumentDBRepository<Person>.GetItemsAsync(
        p => p.LastName == "Pollak")).FirstOrDefault();

    Assert.IsNotNull(person);
    Assert.IsTrue(person.FirstName == "Andreas");
    Assert.IsTrue(person.LastName == "Pollak");
    Assert.IsTrue(person.Age == 38);
    await DocumentDBRepository<Person>.DeleteItemAsync(document.Id);
}
You can find the complete code on GitHub.
First of all you need an azure devops account. You can sign up for free for Azure DevOps here. After you have created a new DevOps Project (in this case with a GIT repository) you can add your source to the git repository like i did below:

To enable Azure CosmosDB Emulator in you CI/CD pipelines you need to install the Azure DevOps pipeline task.
Navigate to the Azure CosmosDB Emulator Task in your browser and click „Get it free“ – Button. After authentication with either your organizational or Microsoft account you can choose the DevOps Account you want to install this task to. In case your devops account is located at https://youraccount.visualstudio.com your account will be listed as: „youraccount“.

Click „Install“ and after the successful install „Proceed to organization“. Select your DevOps project.
Click the Pipelines menu and create a new pipeline by clicking on the „New pipeline“ button in the center of the screen.

First select your pipeline source. You have a varity of options to host your code including DevOps Repos, TFVC, GitHub, GitHub Enterprise, Subversion, BitBucket or any external git repository. In this case just use „Azure Repos Git“ as the source is stored in the DevOps project.

Next choose from many available templates (which allow us also to build Python, Java,… code). Select „ASP.NET Core“ as our template:

The initial pipeline looks like this. Since no emulator is running in the DevOps envionment the tests will fail.

And sure enough they fail:

To enable the Azure CosmosDB Emulator add an additional task to our devops pipeline. This task will run a docker container for windows containing an emulator instance. Since per default the agent host is Linux you need to switch the Build Agent from Linux to Windows:

Now you can select the + sign in the agent job section and add a new task „Azure CosmosDB emulator“ from the „test“ category. Use drag n drop to move it between the tasks „Build“ and „Test“.

It is important to know that the CosmosDB Emulator Task will export an pipeline variable „$(CosmosDbEmulator.Endpoint)“ which will contain the endpoint where the CosmosDB instance will be available.
You can configure your Emulator instance as you like. For example configure the consistency model or the amount of partitions to allocate,…
Now you need to configure the „Test .NET Core“ task to have the unit tests use the endpoint of the emulator you just created. While you can configure a runsettings file, there is currently no way to override parameters (see this open github issue).
Therefore you need to work around this limitation. First of all configure the test task to use a runsettings file that does not yet exist. Right now there is only a „.runnsettings“ file in that folder.
--configuration $(BuildConfiguration) --settings "$(Build.SourcesDirectory)\EmulatorDemo\EmulatorDemoTests\test.runsettings"

Next use a small powershell script task to create this file dynamically. Click on the +-Icon in the „Agent job“ section and find unter the category „Utility“ the task „PowerShell“. Place that script between „Run Azure CosmosDB Emulator“ and „Test .NET Core“.
Now you need to configure two pipeline parameters as environment variables within the script. Open the „Environment variables“ section and configure those values. Attention: Environment variables MUST NOT contain a „.“.
CosmosDbEmulatorEndpoint  = $(CosmosDbEmulator.Endpoint)
BuildSourcesDirectory     = $(Build.SourcesDirectory)

Add your little script. Make sure to select Type = Inline. and copy the following script into the script text field.
# Create test.runsettings file
Write-Host CosmosDB Endpoint: $env:CosmosDbEmulatorEndpoint
Write-Host Source Path: $env:BuildSourcesDirectory

$sourceConfig = $env:BuildSourcesDirectory+"\EmulatorDemo\EmulatorDemoTests\.runsettings"

$parameter = Select-Xml -Path $sourceConfig -XPath '//Parameter[@name="endpoint"]'
$parameter.Node.value = $env:CosmosDbEmulatorEndpoint
$newFileName = $parameter.Path.Replace(".runsettings","test.runsettings")
$parameter.Node.OwnerDocument.Save($newFileName)

And you are ready to roll! And the test run succeeds:

Have fun with Azure DevOps AndiP
In a production environment I usually would use Azure Functions which use the Change Feed Processor Library internally to continuously push changes in my CosmosDB to other destination(s).
However, for some small testing scenarios, demos and also some coding fun, I decided to add ChangeFeed support to the Azure CosmosDB data migration tool (link to original version).
So with this special version of the Azure CosmosDB Data Migration Tool you have additional options for the DocumentDB-Source available unter „Advanced Options“:

Once you check „Use change feed of the collection“ you get following options:

You can select where you want start reading from the change feed. Either start at the creation time of the collection or select a specific date. I admit I could have added a DateTime-Picker :-P.
At „File to read/store continuation tokens“ you can provide a file name to store the continuation tokens. If you re-run the wizard and provide the file again only the new updated documents will be processed.
Last but not least you need to set, if you want to update the provided continuation token file with the new continuation tokens which in most situations is desired.
Thnx
AndiP
