During local development, I often use Azure CosmosDB emulator instead of having a running instance in the cloud. Naturally, my unit tests also use the emulator.
Since our gated check-in requires all unit tests to complete we need to find a way to complete all tests in Azure DevOps.
Luckily there is this handy pipeline task from the Visual Studio Marketplace at hand!
In case you never heard of Azure DevOps (formerly known as VSTS) or Azure pipelines you can get a good overview here. You can sign up for free for Azure DevOps here.
Setting up an ASP.NET Core sample
For our purpose I have created a new MVC Asp.NET Core 2.1 web application in Visual Studio including an additional .NET Core MSTest project ‚EmulatorDemoTests‘ which will contain my unit tests.
In the sample code I use the slightly adapted class DocumentDBRepository from the ToDo-App CosmosDB sample. We add the following nuget packages:
– „Microsoft.Azure.DocumentDB.Core“
– „System.Configuration.ConfigurationManager“.
For the test project i created a file „.runsettings“, which is required to configure the access to our local cosmosdb instance.
<RunSettings>
    <TestRunParameters>
    <!-- Path to the local CosmosDB instance -->
    <Parameter name="endpoint" value="https://localhost:8081" />
    <!-- Wellknown Secret to acccess the emulator instance -->
    <Parameter name="authKey" value="C2y6yDjf5/R+ob0N8A7Cgv30VRDJIWEHLM+4QDU5DE2nQ9nDuVTqobD4b8mGGyPMbIZnqyMsEcaGQy67XIw/Jw==" />
    <!-- Database and collection name -->
    <Parameter name="database" value="demodb" />
    <Parameter name="collection" value="democol" />
  </TestRunParameters>
</RunSettings>
In order to have Visual Studio pick up that file, you need to set the Test Settings file with following commands:
– Test – Test Settings – Select Test Settings File (Select your .runsettings file)
In the „CosmosDBTest“ class I ensure that our DocumentDBRepository is initialized properly with the settings from .runsettings file:
[TestInitialize()]
public void CosmosDBInitialize()
{
    this._EndpointUrl = TestContext.Properties["endpoint"].ToString();
    this._AuthKey = TestContext.Properties["authKey"].ToString();
    this._DatabaseName = TestContext.Properties["database"].ToString();
    this._CollectionName = TestContext.Properties["collection"].ToString();
    DocumentDBRepository<Person>.Initialize(
            this._EndpointUrl,
            this._AuthKey,
            this._DatabaseName,
            this._CollectionName);
}
I have written a simple test case which will suffice for our little sample.
[TestMethod]
public async Task TestInsertDocuments()
{
    var document = await DocumentDBRepository<Person>.CreateItemAsync(new Person
    {
        Age = 38,
        FirstName = "Andreas",
        LastName = "Pollak"
    });
    Assert.IsNotNull(document);
    Assert.IsFalse(string.IsNullOrEmpty(document.Id));

    var person = (await DocumentDBRepository<Person>.GetItemsAsync(
        p => p.LastName == "Pollak")).FirstOrDefault();

    Assert.IsNotNull(person);
    Assert.IsTrue(person.FirstName == "Andreas");
    Assert.IsTrue(person.LastName == "Pollak");
    Assert.IsTrue(person.Age == 38);
    await DocumentDBRepository<Person>.DeleteItemAsync(document.Id);
}
You can find the complete code on GitHub.
Setting up CI/CD pipeline in Azure DevOps
First of all you need an azure devops account. You can sign up for free for Azure DevOps here. After you have created a new DevOps Project (in this case with a GIT repository) you can add your source to the git repository like i did below:

To enable Azure CosmosDB Emulator in you CI/CD pipelines you need to install the Azure DevOps pipeline task.
Navigate to the Azure CosmosDB Emulator Task in your browser and click „Get it free“ – Button. After authentication with either your organizational or Microsoft account you can choose the DevOps Account you want to install this task to. In case your devops account is located at https://youraccount.visualstudio.com your account will be listed as: „youraccount“.

Click „Install“ and after the successful install „Proceed to organization“. Select your DevOps project.
Click the Pipelines menu and create a new pipeline by clicking on the „New pipeline“ button in the center of the screen.

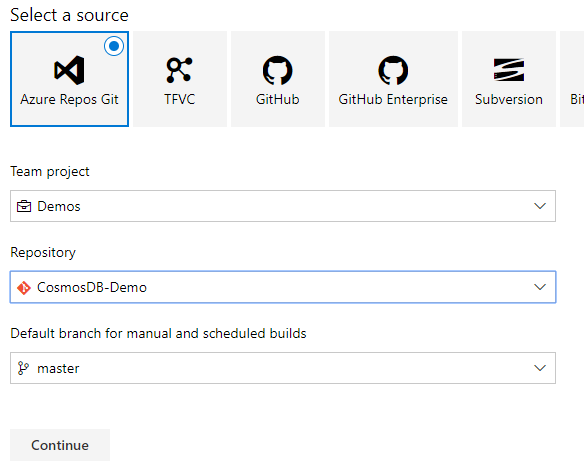
First select your pipeline source. You have a varity of options to host your code including DevOps Repos, TFVC, GitHub, GitHub Enterprise, Subversion, BitBucket or any external git repository. In this case just use „Azure Repos Git“ as the source is stored in the DevOps project.

Next choose from many available templates (which allow us also to build Python, Java,… code). Select „ASP.NET Core“ as our template:

The initial pipeline looks like this. Since no emulator is running in the DevOps envionment the tests will fail.

And sure enough they fail:

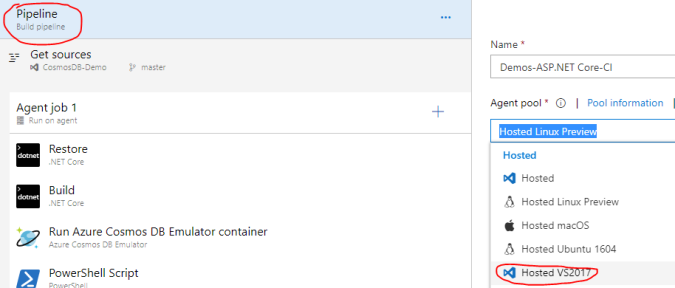
To enable the Azure CosmosDB Emulator add an additional task to our devops pipeline. This task will run a docker container for windows containing an emulator instance. Since per default the agent host is Linux you need to switch the Build Agent from Linux to Windows:

Now you can select the + sign in the agent job section and add a new task „Azure CosmosDB emulator“ from the „test“ category. Use drag n drop to move it between the tasks „Build“ and „Test“.

It is important to know that the CosmosDB Emulator Task will export an pipeline variable „$(CosmosDbEmulator.Endpoint)“ which will contain the endpoint where the CosmosDB instance will be available.
You can configure your Emulator instance as you like. For example configure the consistency model or the amount of partitions to allocate,…
Now you need to configure the „Test .NET Core“ task to have the unit tests use the endpoint of the emulator you just created. While you can configure a runsettings file, there is currently no way to override parameters (see this open github issue).
Therefore you need to work around this limitation. First of all configure the test task to use a runsettings file that does not yet exist. Right now there is only a „.runnsettings“ file in that folder.
--configuration $(BuildConfiguration) --settings "$(Build.SourcesDirectory)\EmulatorDemo\EmulatorDemoTests\test.runsettings"

Next use a small powershell script task to create this file dynamically. Click on the +-Icon in the „Agent job“ section and find unter the category „Utility“ the task „PowerShell“. Place that script between „Run Azure CosmosDB Emulator“ and „Test .NET Core“.
Now you need to configure two pipeline parameters as environment variables within the script. Open the „Environment variables“ section and configure those values. Attention: Environment variables MUST NOT contain a „.“.
CosmosDbEmulatorEndpoint  = $(CosmosDbEmulator.Endpoint)
BuildSourcesDirectory     = $(Build.SourcesDirectory)

Add your little script. Make sure to select Type = Inline. and copy the following script into the script text field.
# Create test.runsettings file
Write-Host CosmosDB Endpoint: $env:CosmosDbEmulatorEndpoint
Write-Host Source Path: $env:BuildSourcesDirectory

$sourceConfig = $env:BuildSourcesDirectory+"\EmulatorDemo\EmulatorDemoTests\.runsettings"

$parameter = Select-Xml -Path $sourceConfig -XPath '//Parameter[@name="endpoint"]'
$parameter.Node.value = $env:CosmosDbEmulatorEndpoint
$newFileName = $parameter.Path.Replace(".runsettings","test.runsettings")
$parameter.Node.OwnerDocument.Save($newFileName)

And you are ready to roll! And the test run succeeds:

Have fun with Azure DevOps AndiP